The Simple Joy of Homemade Bread: Your Kitchen’s New Best Friend
Hey there, friend! Mason here. Can we talk about something magical? That moment when you pull a loaf of homemade bread out of the oven. The crazy-good aroma wrapping around your kitchen like a warm hug, the golden crust crackling like a campfire, that first tender bite slathered in butter… pure happiness, right? I get it—baking bread can feel intimidating. But trust me, this isn’t some fussy artisanal project. This is your back-pocket basic white bread—soft, fluffy, and shockingly simple. It’s the recipe I hand to friends who swear they’re “bread-cursed.” No fancy tools, no PhD in yeast required. Just you, a bowl, and the kind of comfort food that turns a Tuesday into something special. Whether you’re making PB&Js for the kids, garlic toast for pasta night, or just need something to dunk in soup (my personal therapy), this loaf is your ride-or-die. Let’s ditch the store-bought sadness and bake something that makes your kitchen smell like a grandmother’s dream. Ready to get your hands dusty and your heart full? Let’s do this.
Flour Dust & Grandma’s Apron: Where My Bread Love Began
PrintBasic White Bread
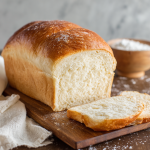
Nothing beats the smell of fresh bread baking in your kitchen. This classic white bread recipe is easy to follow and delivers a soft, fluffy loaf with a golden crust—perfect for sandwiches, toast, or just enjoying warm with butter. Bake it once, and you’ll want it on repeat!
- Prep Time: 15 minutes
- rise time: 1.5–2 hours
- Cook Time: 25–30 minutes
- Total Time: ~2.5 hours
- Yield: 1 loaf (about 12 slices) 1x
Ingredients
4 cups all-purpose flour
• 2¼ tsp active dry yeast
• 2 tbsp sugar
• 1½ tsp salt
• 1½ cups warm water
• 2 tbsp unsalted butter, melted
Instructions
In a large bowl, mix together flour, yeast, sugar, and salt.
Add warm water and melted butter. Stir until a dough forms.
Knead dough on a floured surface for about 8–10 minutes until smooth and elastic.
Place dough in a greased bowl, cover, and let it rise in a warm spot until doubled in size (about 1 hour).
Punch down the dough. Shape into a loaf and place in a greased loaf pan.
Let it rise again until doubled (about 30–40 minutes).
Bake at 375°F (190°C) for 25–30 minutes or until golden brown on top. Cool before slicing.
Nutrition
- Calories: 150
- Sugar: 2g
- Sodium: 220mg
- Fat: 2.5g
- Carbohydrates: 28g
- Protein: 4g
Picture this: I’m eight years old, standing on a wobbly wooden stool in my Grandma Eleanor’s kitchen. Flour is EVERYWHERE—on my nose, the linoleum, probably the cat. She’s showing me how to knead dough, her hands guiding mine, strong and sure. “Feel it, Mason,” she’d rasp in that voice worn smooth by decades of laughter and Lucky Strikes. “It’s alive. Like your heart beating.” I remember the sticky mess on my fingers, the way the dough sighed under my palms, and the epic flour fight that inevitably followed when I “accidentally” flicked some her way. But the real magic? The waiting. That agonizing stretch while the dough rose under her favorite faded tea towel. We’d play gin rummy, stealing glances at the bowl like it held state secrets. When that loaf finally emerged, golden and triumphant, we’d tear into it while it was still too hot, burning our tongues on melting butter. No fancy technique, just pure, messy, butter-dripping-down-your-chin JOY. That’s what this recipe is for me—not just bread, but a warm kitchen memory baked right in. Every time I bake it, I swear I smell her rosewater perfume mixed with yeast. Magic, I tell ya.
Your Bread Basket Brigade: Simple Ingredients, Big Flavor
Gather your squad! These humble heroes transform into something extraordinary. Don’t stress perfection—cooking’s an adventure, not a lab experiment. Here’s the lineup:
- 4 cups all-purpose flour: The trusty backbone! It gives structure without being fussy. Chef’s Tip: Scoop flour into your measuring cup with a spoon and level it off—don’t dunk the cup straight into the bag. Packed flour = dense bread. Swap It: Need whole wheat? Replace 1 cup AP flour with whole wheat for a nutty twist (add 1-2 tbsp extra water).
- 2¼ tsp active dry yeast (1 packet): The tiny powerhouse! This is what makes your bread rise and sigh beautifully. Chef’s Insight: Check the expiry date! Old yeast = sad, flat bread. It should smell earthy, not musty.
- 2 tbsp sugar: Yeast’s favorite snack! It feeds the yeast for a good rise and adds a hint of sweetness. Swap It: Honey or maple syrup work beautifully for deeper flavor.
- 1½ tsp salt: The flavor booster! Crucial for balancing taste and controlling yeast activity. Don’t Skip It! Saltless bread tastes bland and can over-rise.
- 1½ cups warm water (105-110°F / 40-43°C): The activator! Warmth wakes up the yeast. Chef’s Hack: Test water on your wrist—it should feel like a cozy bath, not hot. Too hot kills yeast; too cold puts it to sleep.
- 2 tbsp unsalted butter, melted: The tenderness wizard! Butter adds richness, softness, and that gorgeous golden crust. Swap It: Olive oil or even avocado oil works for a slightly different flavor profile.
Let’s Get Kneady: Your Foolproof Bread Journey
Channel your inner bread whisperer! This isn’t rocket science—it’s rhythm and feel. Follow these steps, throw in some love, and watch the magic happen.
- Wake Up Your Yeast Party (Sorta Optional, But Recommended): In your large mixing bowl, whisk together the warm water, sugar, and yeast. Let it sit for 5-10 minutes. Look for the “bloom”: It should get foamy and smell bready, like a tiny yeast jacuzzi! If it doesn’t bubble, your yeast might be napping (or worse). Start over with fresh yeast. Chef’s Shortcut: You CAN skip this step and mix everything together directly if you’re confident in your yeast’s freshness, but blooming gives you proof (literally!) it’s alive.
- Flour Power Unite! Add the flour and salt to the yeasty water (or if you bloomed, to the bloomed mixture). Pour in the melted butter. Stir with a sturdy wooden spoon or dough whisk until a shaggy, sticky dough forms. It won’t be pretty yet—that’s okay! Embrace the mess.
- Knead with Gusto (The Therapy Session): Dump the dough onto a lightly floured surface. Flour your hands too! Now, the fun part: kneading! Use the heel of your hand to push the dough away from you, then fold it back over itself, give it a quarter turn, and repeat. Chef’s Rhythm: Push, fold, turn. Push, fold, turn. Think smooth, firm strokes, not frantic pounding. Knead for 8-10 minutes. How to know it’s ready? Do the “Windowpane Test”: Pinch off a small piece and gently stretch it. If you can stretch it thin enough to see light through it without it tearing immediately (like a windowpane!), you’re golden. The dough should feel smooth, elastic, and slightly tacky but not stickier than a toddler with honey.
- First Rise: The Cozy Nap: Lightly grease a clean bowl (or just wipe out your mixing bowl) with oil or butter. Place your beautiful dough ball inside, turning it once to coat lightly in oil. This prevents drying! Cover the bowl tightly with plastic wrap or a damp, clean kitchen towel. Chef’s Warm Spot Hack: Let it rise in a warm, draft-free spot. No perfect warm spot? Turn your oven light on and place the bowl inside the OFF oven. Perfect little proofing box! Let it rise until doubled in size—about 1 hour. Don’t rush it! Patience = fluffy bread.
- Punch Down & Shape (Get Your Feel-Good Aggression Out): Gently punch the risen dough right in the center to deflate it. It’s satisfying, right? Turn it out onto a lightly floured surface. Gently shape it into a rough rectangle, about the length of your loaf pan. Roll it up tightly, starting from a short end, pinching the seam closed as you go. Pinch the ends closed too. Place seam-side down into a greased 9×5 inch loaf pan.
- Second Rise: The Final Countdown: Cover the loaf pan loosely with plastic wrap or that damp towel again. Let it rise in its warm spot until it crests about 1 inch above the rim of the pan—another 30-40 minutes. Meanwhile, preheat your oven to 375°F (190°C). Pro Tip: Position a rack in the center.
- Bake to Golden Perfection: Uncover your gorgeous risen loaf. Place it gently in the preheated oven. Bake for 25-30 minutes. Chef’s Golden Rule: Don’t open the oven door for the first 20 minutes! Trust the process. The loaf is done when it’s deep golden brown on top and sounds hollow when you tap the bottom crust (carefully!). Optional Shine: For a softer crust, brush the top with melted butter right when it comes out.
- The Crucial Cool-Down (Resist the Temptation!): This is HARD, I know. But transfer the loaf from the pan to a wire rack immediately. Let it cool COMPLETELY (at least 1 hour) before slicing. Why? Slicing hot bread traps steam, making it gummy inside. Let those beautiful structures set! Distract yourself by cleaning up… or just stare at it lovingly.
Slice, Smile, Repeat: Serving Your Masterpiece
Alright, the wait is over! That gorgeous loaf is cool, and it’s SHOWTIME. For the ultimate experience, use a serrated bread knife—saw gently, don’t press down! Thick slices are perfect for slathering with room-temperature butter (it spreads like a dream). Thin slices make killer toast or classic sandwiches. Feeling fancy? Drizzle slices with good olive oil and flaky sea salt. Hosting brunch? Cube it for the best croutons or bread pudding you’ve ever had. Honestly? Standing at the counter, ripping off a warm chunk straight from the loaf (we won’t judge!) with butter melting into rivers… that’s peak living, my friend. Enjoy it simply. That’s the whole point.
Mix It Up! Your Bread, Your Rules
Mastered the classic? Let’s play! This dough is your blank canvas:
- Herb & Garlic Swirl: Roll out the dough before the final shaping into a rectangle. Brush with olive oil, sprinkle generously with minced garlic, dried oregano, basil, and a pinch of red pepper flakes. Roll up, seal, and bake! Savory heaven.
- Seeded Sandwich Loaf: Mix 2 tbsp each sesame seeds, poppy seeds, and sunflower seeds into the dry ingredients. Sprinkle extra seeds on top before baking for crunch and nutty flavor.
- Cheddar & Jalapeño Kick: Knead in 1 cup shredded sharp cheddar and ¼ cup finely diced pickled jalapeños during the last minute of kneading. Cheesy, spicy, and impossible to resist warm.
- Honey Oat Comfort: Replace ½ cup AP flour with rolled oats. Swap the sugar for honey. Feels wholesome and tastes subtly sweet.
- Dairy-Free Delight: Use neutral oil (like avocado) instead of butter, and ensure your sugar is vegan. Works like a charm!
Mason’s Bread Confessions & Evolution
Okay, full disclosure: my first solo loaf? A BRICK. Dense enough to build a tiny house. I nearly gave up! But here’s the thing—bread teaches patience and resilience. This recipe evolved through countless trials (and errors!). I learned that flour absorbs humidity differently on rainy days (add water 1 tbsp at a time if dough feels dry). I discovered my oven runs hot (now I check at 20 mins!). Once, I forgot the salt… never again. That bland disaster lives in infamy! The biggest shift? Embracing the feel over rigid times. Is your kitchen cold? Rise might take longer. Dough too sticky after kneading? A tiny sprinkle of flour helps. It’s a conversation with your ingredients. These days, this recipe is my comfort ritual. Rainy Sunday? Bake bread. Stressed about work? Bake bread. Need to impress my partner? You guessed it. It’s become less about perfection, more about the joy in the process—flour on my apron, the rhythmic kneading, that triumphant smell. That’s the real magic. Keep baking, friends!
Your Bread Queries, Answered!
Ran into a snag? No sweat! Here’s the scoop on common hiccups:
- Q: My dough didn’t rise! Help! What went wrong?
A: Don’t panic! The usual suspects: Old Yeast (Always check expiry!). Water Too Hot/Cold (Yeast is Goldilocks – needs it just right. Use a thermometer if unsure!). Drafty Spot (Find a warmer, cozier proofing nook like the off-oven-with-light-on trick). If it’s completely lifeless after an hour, your yeast might be DOA. Start fresh—it happens to the best of us! - Q: Why is my bread so dense and heavy?
A: A few culprits: Over-measuring Flour (Scoop & level, don’t pack!). Under-Kneading (Didn’t develop enough gluten – aim for that smooth, elastic feel and windowpane test!). Under-Proofing (Didn’t let it rise long enough – it should truly double!). Over-Proofing (Risen too long – it collapses and gets dense. Stick to the time ranges as a guide, but watch the dough, not just the clock!). - Q: My crust is super hard! How do I get a softer crust?
A: A few tricks! Butter Brush: Brush melted butter on the hot loaf right out of the oven. Cool Covered (Slightly): Tent the loaf loosely with foil for the last 5-10 minutes of baking if browning too fast, OR place it under a clean inverted bowl for the first 10 minutes of cooling. Steam: Place a pan of hot water on the oven rack below the bread during baking (adds moisture for a softer crust). - Q: Can I make this dough ahead? How do I store the bread?
A: Absolutely! Overnight First Rise: After kneading, place dough in the greased bowl, cover tightly, -
Final Thoughts
There’s something undeniably special about baking your own bread—something that goes beyond the crust and crumb. It’s in the way your kitchen smells like a cozy bakery. It’s in the butter melting into a still-warm slice. It’s in the proud little moment when you realize you made that. Whether you’re a first-time bread baker or a seasoned dough whisperer, I hope this white bread recipe brings as much comfort to your table as it has to mine. So go ahead—bake, slice, share, and savor every bite. Because in this house, warm bread = love.