Wave Goodbye to Sad Desk Lunches (And Soggy Sandwiches!)
Hey friends! Mason Hartman here, back at the digital kitchen table. Let’s be real for a sec: lunchtime can feel like the most uninspired meal of the day, right? Especially when you’re staring down yet another sad, soggy sandwich that lost its will to live somewhere between the mayo and the commute. And if you’re packing lunches for tiny humans? The struggle is REAL. The eye-rolls, the half-eaten returns, the “but I don’t LIKE it like THAT anymore!” declarations… sound familiar? Yeah, I’ve been deep in those trenches too.
That’s exactly why I’m obsessed with this Build-a-Bagel Lunch Kit. It’s not just lunch; it’s a tiny, edible adventure packed in a box! Think of it as a choose-your-own-flavor story starring a trusty bagel. We’re talking crispy, fresh halves just begging to be slathered, stacked, and savored, paired with little compartments full of spreadable magic, savory slices, crunchy veggies, and maybe even a sweet surprise. The best part? Zero sogginess, maximum creativity, and it takes less time to assemble than it does to find a matching pair of socks on a Monday morning.
This isn’t about fancy techniques or hunting down unicorn ingredients. It’s about reclaiming lunchtime joy, whether you’re packing it for a kiddo, your awesome self, or your partner who’s stuck in back-to-back Zoom calls. It’s interactive, fresh, and packed with that “heck yeah!” factor. Ready to turn lunch from meh to magnificent? Grab your favorite bagel, and let’s build some edible happiness!
The “Aha!” Moment: Chaos, Kids, and a Brilliantly Messy Idea
PrintBuild-a-Bagel Lunch Kit

Say goodbye to soggy sandwiches and hello to lunchtime creativity with this Build-a-Bagel Lunch Kit! Featuring halved bagels and a mix of spreadables, proteins, and toppings in tidy compartments, this kit lets kids (or grownups) customize every bite. It’s fresh, interactive, and packed with lunchtime fun.
- Prep Time: 10 minutes
- Total Time: 10 minutes
- Yield: 1 lunch kit 1x
Ingredients
1 whole bagel, halved (plain, whole wheat, or mini)
Cream cheese and/or jam in small containers
Deli slices (turkey, ham, or salami)
Sliced cheese (cheddar, Swiss, or mozzarella)
Optional toppings: cucumber slices, tomato, lettuce, apple slices
Instructions
Slice bagel in half and store separately to keep fresh.
Pack cream cheese, jam, and any spreads in small containers.
Arrange deli slices, cheese, and toppings in divided sections.
At lunch, kids can build their own bagel sandwich any way they like.
Add a spoon or spreader for easy assembly
Notes
Hands-on, mess-free, and endlessly customizable—this kit makes lunchtime something to look forward to
Nutrition
- Calories: 400–500
- Sugar: 6g
- Fat: 20g
- Carbohydrates: 40g
- Fiber: 3g
- Protein: 20g
Okay, picture this: It’s a chaotic Tuesday morning. My niece, Maya (a fiercely opinionated 7-year-old food critic), is staging a lunchbox rebellion. “Uncle Mason,” she declares, nose wrinkled, “my sandwich is BORING. And squished.” She wasn’t wrong. That poor PB&J looked defeated. Later that week, I was hosting a casual backyard hang. I plated up a big bagel board with all the fixings – cream cheeses, smoked salmon, capers, the works – and let everyone go wild. Watching my friends laugh, customize, and absolutely devour their creations? Total lightbulb moment.
Why couldn’t lunch be like this? Fun, fresh, and firmly in the eater’s control? I remembered Maya’s rebellion and realized the key wasn’t just better ingredients, but ownership. Kids (and let’s be honest, adults too!) want to be the architects of their own meals. The next day, I grabbed a compartmentalized bento box, halved a plain bagel, scooped some cream cheese into a tiny tub, piled in turkey slices, cheddar squares, cucumber rounds, and a few apple slices for sweetness. I tossed in a mini spreader and sent Maya off. The report back? “BEST. LUNCH. EVER. I made a TURKEY CASTLE!” The sheer joy in her voice, the empty container… that was it. The Build-a-Bagel Lunch Kit was born from kitchen chaos and a kid’s demand for delicious autonomy. Now, it’s my go-to secret weapon against lunchtime blues.
Your Build-a-Bagel Toolkit: Simple Staples, Endless Options
Here’s the beautiful part – this kit thrives on flexibility! Raid your fridge, hit the deli counter, and let preferences guide you. This is the core blueprint:
- 1 Whole Bagel, Halved (Plain, Whole Wheat, Everything, or Mini Bagels): The sturdy foundation! Chef Tip: Slightly stale bagels work GREAT here – they hold up better and won’t get gummy. Day-olds are your friend! Pre-slice and store halves in separate baggies or containers to keep them perfect.
- Cream Cheese and/or Jam (in small containers): The glue & the groove! Substitution Magic: Nut butters (peanut, almond, sunflower), hummus, mashed avocado (squeeze lemon juice on top to prevent browning), pesto, or even a flavored cream cheese spread. Use small, reusable containers or silicone cupcake liners within the kit.
- Deli Slices (Turkey, Ham, Roast Beef, or Salami – about 2-3 slices): The protein power! Chef Insight: Look for lower-sodium options if that’s a concern. Rolled up or folded deli slices are more fun and easier to stack than flat ones! Leftover grilled chicken? Thinly slice it!
- Sliced Cheese (Cheddar, Swiss, Provolone, or Mozzarella – 1-2 slices): The creamy, melty (or not!) counterpoint. Substitution/Insight: Pre-sliced cheese sticks work wonders for portion control. Dairy-free? There are fantastic vegan cheese slices available now. Cut cheese into squares, triangles, or fun shapes with cookie cutters!
- Optional Toppings (Pick 2-3!): Cucumber slices, tomato wedges (pat dry!), lettuce/spinach, apple slices (squeeze lemon juice to prevent browning), shredded carrot, bell pepper strips, olives, pickles, even a few raisins or dried cranberries for a sweet pop. Chef Hack: CRUNCH IS KEY! Toppings add texture and freshness. Patting tomatoes dry is crucial to avoid unwanted moisture.
Building Brilliance: Your Step-by-Step Guide to Lunch Kit Glory
Alright, team! Assembling this kit is easier than teaching a goldfish to swim. Here’s how to nail it:
- Slay the Bagel: Grab your chosen bagel and a sharp serrated knife. Carefully slice it in half horizontally. Chef Hack: Feeling fancy? Lightly toast the halves *before* packing! They travel better than untoasted and stay crisp. Let them cool completely before packing. Seriously, cool is crucial!
- Contain the Spreadable Joy: Scoop your cream cheese, jam, hummus, or chosen spread into small, lidded containers. Pro Tip: Use containers that are just the right size – too big wastes space, too small is frustrating. Mini mason jars, reusable silicone pods, or even cleaned-out yogurt tubs work. Label them if you’re feeling extra organized!
- Prep & Pack the Protein & Cheese: Fold or roll your deli slices. Cut your cheese into manageable pieces (squares, sticks, fun shapes!). Chef Insight: Place a small piece of parchment or lettuce between cheese slices if stacking to prevent them from sticking together like glue. Nobody wants a cheese brick!
- Conquer the Crunch: Wash and prep your chosen toppings. Pat anything watery (tomatoes, cucumbers) really dry with a paper towel. This is the #1 defense against sogginess! Slice apples and toss with a tiny squeeze of lemon juice. Time Saver: Prep a big batch of dry toppings (carrot sticks, bell peppers) at the start of the week and grab handfuls as needed!
- Assemble the Masterpiece (The Kit!): Grab your compartmentalized lunch container (a bento box is PERFECT). Place the bagel halves in their own compartment or side-by-side. Nestle the containers of spread into one section. Artfully arrange the deli slices, cheese pieces, and toppings in the remaining sections. Packing Hack: Put the sturdiest items (apple slices, cheese) near the bagel if they might shift. Use silicone baking cups within larger compartments to keep tiny items (olives, raisins) contained!
- Don’t Forget the Tool! Tuck in a small, reusable spreader or butter knife. Final Chef Whisper: Pop an ice pack on top or beside the kit in the lunchbox to keep everything beautifully fresh and crisp until lunchtime rolls around. Victory!
Lunchtime Showtime: How to Serve Up the Fun
The magic happens at lunchtime! The beauty of this kit is its simplicity. Just open it up and let the building begin. For kids, it’s like opening a delicious present – “Look what I get to make!” Encourage them to spread, stack, layer, and create their perfect bite. Maybe they want a classic cream cheese and turkey stack. Maybe they go wild with hummus, cheddar, apple slices, and pickles (hey, no judgment here!). For adults, it’s a mindful little break – a moment of delicious, customizable calm in the middle of the day. Pair it with a handful of grapes, some baby carrots, or a simple side salad for a complete meal. The only rule? Have fun with it!
Mix It Up! Flavor Adventures for Your Bagel Kit
Don’t get stuck in a rut! This kit is a blank canvas. Here are 5 tasty twists to keep things exciting:
- The “Everything” Brunch Kit: Everything bagel, scallion cream cheese, smoked salmon (or turkey for a swap), capers, thin red onion slices, and a lemon wedge for squeezing.
- Mediterranean Sunshine: Plain or whole wheat bagel, hummus, sliced cucumber, tomato, crumbled feta cheese, kalamata olives (pitted!), and a sprinkle of dried oregano.
- Sweet & Savory Powerhouse: Cinnamon raisin bagel, almond butter, apple slices, sharp cheddar cheese cubes, and a drizzle of honey (packed separately!).
- Veggie-Loaded Delight (Vegan-Friendly!): Whole wheat or plain bagel, dairy-free cream cheese or hummus, avocado slices (lemon juice!), shredded carrot, bell pepper strips, sprouts, and nutritional yeast for a cheesy sprinkle.
- The Pizza Pretender: Plain bagel, pizza sauce (in a small container!), shredded mozzarella, mini pepperoni slices, and maybe a sprinkle of dried basil. (Pack separately, build, and if possible, pop it under a broiler/toaster oven for a minute to melt – or enjoy cold!).
Mason’s Musings: From Chaos to Culinary Win
This little kit has come a long way since that “aha!” moment with Maya! At first, I definitely overcomplicated it – too many choices led to decision paralysis (for both of us!). I learned that 3-4 topping options are the sweet spot. I also learned the hard way about un-patted tomatoes… let’s just say it involved a very sad, soggy bagel and a disappointed kid. Lesson learned: DRY THOSE VEGGIES!
One of my favorite evolutions? The “mini bagel” revolution! Using mini bagels is perfect for smaller appetites or for creating multiple mini-sandwiches. It’s also hilarious (and heartwarming) to see the combinations people invent. My buddy Dave, a self-proclaimed “sandwich minimalist,” shocked everyone by building a towering masterpiece with hummus, salami, cheddar, apple slices, AND pickles. He claimed it was “flavor harmony.” I claim he’s a secret lunch artist. The point is, this kit empowers everyone to be their own lunchtime chef. It’s sparked more joy (and fewer lunchbox returns) than anything else I’ve tried. Give it a go, embrace the little bit of prep, and get ready for some seriously happy lunchtimes!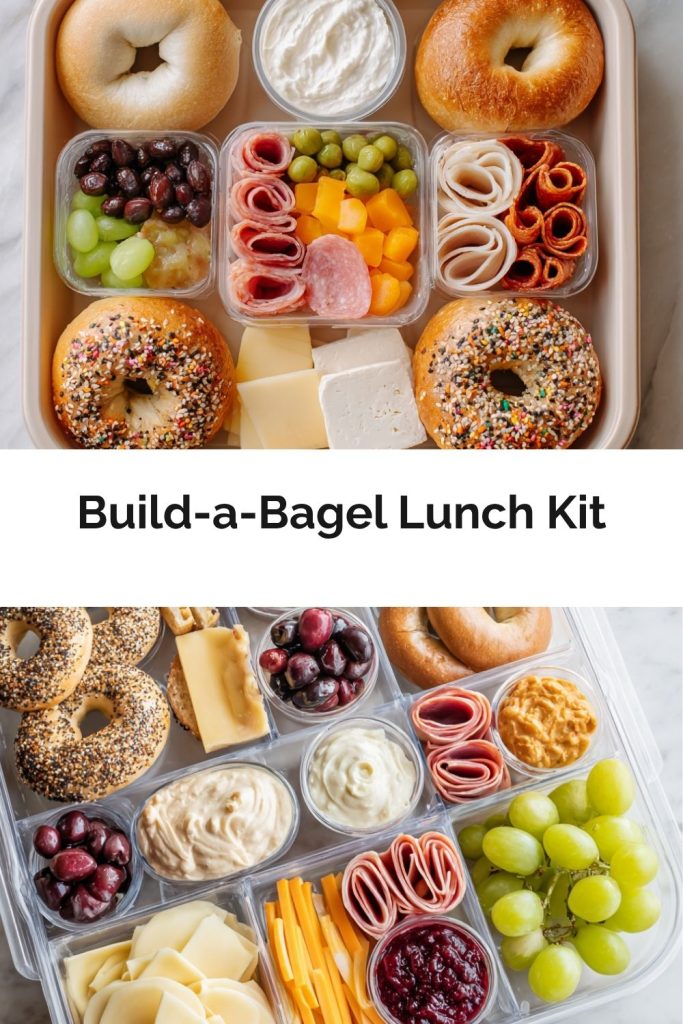
Final Thoughts
Lunchtime doesn’t have to be a letdown—especially when you’ve got a Build-a-Bagel Lunch Kit in your arsenal. It’s more than food; it’s an experience. Whether you’re packing for a picky kid, an overworked spouse, or your future hungry self, this kit turns “blah” lunches into joyful bites of personality and play. Easy to prep, endlessly customizable, and completely soggy-proof, it’s your new lunchbox MVP. So wave goodbye to sad sandwiches and say hello to lunch that actually gets eaten (with a smile).