Introduction
Hey friends, Mason here! Pull up a stool at my digital kitchen table. Ever have one of those days where only a serious chocolate intervention will do? Where a regular brownie feels like a polite handshake when what you really crave is a full-on, soul-warming bear hug of cocoa bliss? That’s exactly why we’re diving fork-first into this Molten Chocolate Crackle Pie today.
Picture this: a flaky, buttery crust cradling a dark chocolate filling that’s pure magic. The top bakes up into this gorgeous, dramatic CRACKLED crust – like a desert landscape begging for rain. But crack through that surface? Oh, baby. What waits underneath is pure, molten, silky chocolate lava. It’s like if a brownie and a chocolate soufflé had a gorgeous, deeply indulgent love child. This isn’t just dessert; it’s an experience.
And the best part? It’s shockingly simple. No fancy techniques, no obscure ingredients hiding in the back of your spice cabinet. Just straightforward, soul-satisfying chocolate therapy. Whether you’re wrangling kids, surviving a brutal work week, or celebrating a tiny Tuesday victory, this pie is your edible high-five. It’s the kind of dessert that makes people pause mid-bite, close their eyes, and murmur something deeply appreciative (usually with a mouth full of chocolate). Ready to make some kitchen magic? Let’s bake a memory.
The Great Chocolate Meltdown (A Love Story)
PrintMolten Chocolate Crackle Pie
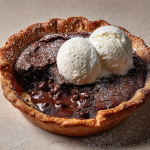
This pie is pure chocolate decadence — a crackly top gives way to a rich, molten center that’s silky, gooey, and every chocoholic’s dream. With a flaky crust and brownie-like texture, it’s the ultimate dessert for when only something truly indulgent will do.
- Prep Time: 15 mins
- Cook Time: 45 mins
- Total Time: 1 hour
- Yield: 8 slices 1x
Ingredients
1 9-inch unbaked pie crust (homemade or store-bought)
1 cup (2 sticks) unsalted butter
1/3 cup dark chocolate chips or chopped dark chocolate
1 ¾ cups granulated sugar
¾ cup unsweetened cocoa powder
½ cup all-purpose flour
½ tsp kosher salt
4 large eggs
1 tbsp vanilla extract
Optional: powdered sugar for dusting, whipped cream or ice cream for serving
Instructions
Preheat oven to 350°F (175°C). Place the pie crust in a 9-inch pie dish and crimp edges as desired.
In a saucepan, melt butter over medium heat. Remove from heat and stir in chocolate until smooth. Let cool slightly.
In a large bowl, whisk sugar, cocoa powder, flour, and salt.
Add eggs, one at a time, whisking well after each addition.
Stir in vanilla and melted chocolate-butter mixture until fully combined.
Pour filling into the prepared crust and smooth the top.
Bake 40–45 minutes, until the top is puffed and crackly but the center jiggles slightly.
Cool at room temperature for 30 minutes to let the center set. Serve warm for molten goodness or chilled for a fudgy texture.
Nutrition
- Calories: 460
- Sugar: 34g
- Fat: 28g
- Carbohydrates: 48g
- Protein: 5g
This pie? It’s basically my culinary comfort blanket. It was born from a legendary kitchen disaster turned triumph. Years ago, I was attempting a fancy chocolate soufflé for a first date (ambitious, I know!). Naturally, I got distracted telling a story, lost track of time, and pulled out what looked like a chocolate asteroid. Mortified, I plunged a spoon into the cracked, cratered surface… only to discover a river of warm, molten chocolate flowing underneath. My date took one bite, eyes widened, and declared it the best “accident” she’d ever eaten. (Spoiler: She married me. Coincidence? I think not!).
That glorious failure taught me a beautiful lesson: Sometimes the best things in life (and the kitchen) aren’t pristine. They’re a little messy, deeply imperfect, and bursting with unexpected joy. This Molten Chocolate Crackle Pie is my homage to happy accidents and the magic that happens when we embrace the chaos. It’s got that dramatic, crackly top born from my soufflé blunder, but anchored in a comforting pie crust because, well, pie makes everything better. It’s become my signature “bad day buster” and my most requested celebration dessert. Every crackle top feels like a little reminder that beauty – and deliciousness – often lies beneath the surface.
Gathering Your Chocolate Arsenal
Here’s the beauty squad for your chocolate masterpiece. Don’t sweat perfection – flexibility is key!
- 1 9-inch unbaked pie crust (homemade or store-bought): Your edible vessel! A good quality store-bought crust is a lifesaver (no shame!). If you’re feeling fancy, a homemade all-butter crust adds next-level flavor. Chef’s Tip: If using frozen, thaw it completely first.
- 1 cup (2 sticks) unsalted butter: The rich foundation. Unsalted lets you control the saltiness. Sub Alert: Salted butter works too! Just reduce the added salt by half.
- 1/3 cup dark chocolate chips or chopped dark chocolate: Deepens the chocolate flavor. Insider Move: Use 60-70% cacao for the best balance – not too bitter, not too sweet. Semi-sweet chips work if that’s what you have!
- 1 ¾ cups granulated sugar: Sweetens the deal. Pro Insight: This seems like a lot, but it balances the intense cocoa and creates that signature crackle.
- ¾ cup unsweetened cocoa powder: The heart and soul! Use natural or Dutch-processed. Dutch-processed gives a slightly smoother, darker flavor. No Sub! Sweetened cocoa won’t work here.
- ½ cup all-purpose flour: Just enough to give structure without turning it cakey. Gluten-Free Swap: Use a 1:1 gluten-free flour blend with xanthan gum.
- ½ tsp kosher salt: Essential! It amplifies the chocolate flavor. If using table salt, use ¼ tsp.
- 4 large eggs: Binds the magic and creates the lift. Make sure they’re at room temperature for best blending. Cold eggs can make the butter seize.
- 1 tbsp vanilla extract: The flavor enhancer. Pure vanilla is worth it! Fun Twist: Swap in 1 tsp almond extract for a subtle depth.
- Optional: powdered sugar for dusting, whipped cream or ice cream for serving: The supporting cast that elevates it to star status. Vanilla ice cream melting into the warm pie? Pure heaven.
Crafting Your Chocolate Masterpiece: Step-by-Step
Alright, team! Let’s get our hands chocolatey. This is where the magic happens, and it’s easier than you think.
- Preheat & Prep: Fire up your oven to 350°F (175°C). Grab your trusty 9-inch pie dish. Gently place your pie crust in there, tucking it in snugly. Crimp the edges however you like – fancy flutes or rustic thumbs work equally well! Chef’s Hack: Pop the crust in the fridge while you prep the filling. A cold crust helps prevent soggy bottoms!
- Butter & Chocolate Meltdown: Grab a medium saucepan. Melt the butter over medium heat – just until it’s fully liquid and maybe starting to bubble slightly at the edges. Watch it like a hawk! Butter burns fast. Immediately take it off the heat. Dump in your dark chocolate chips or chunks. Stir, stir, stir until it’s smooth, glossy, and looks like liquid velvet. Let this gorgeous mixture cool for about 5 minutes. Why? Adding boiling hot butter/chocolate to eggs = scrambled eggs in your pie. Not the vibe.
- Dry Team Huddle: In a large bowl (I mean LARGE, this gets voluminous!), whisk together the granulated sugar, cocoa powder, all-purpose flour, and kosher salt. Get out any cocoa lumps! This is your flavor base.
- Egg-cellent Integration: Crack in the eggs, one at a time. Whisk vigorously after each addition until it’s fully incorporated before adding the next one. Pro Tip: Room temp eggs blend in much smoother and faster than cold ones. This step builds structure and air, helping that top crackle later! The mixture will look thick and grainy at first – that’s normal. Keep whisking!
- Vanilla & The Big Pour: Stir in that glorious tablespoon of vanilla extract. Now, slowly pour in the slightly cooled chocolate-butter mixture. Whisk constantly as you pour! You’re aiming for a smooth, homogenous, dark, and decadent batter. It should be pourable but thick. Chef’s Note: If you see little specks of cooked egg, you poured the hot mixture in too fast! Don’t panic, it’ll still taste amazing, just whisk like crazy.
- Fill ‘Er Up: Retrieve your chilled pie crust. Give your filling one final whisk for good luck. Carefully pour the rich, dark filling into the crust. Smooth the top gently with a spatula or the back of a spoon. Don’t overfill! Leave about ¼ inch space below the crimped edge to prevent overflow disasters.
- Bake to Perfection (aka The Jiggle Test): Slide that beauty into your preheated oven. Bake for 40-45 minutes. Here’s the CRITICAL part: DO NOT OVERBAKE. You want the top to be beautifully puffed and covered in an intricate network of cracks – it should look dry and set. But when you gently nudge the pan? The center underneath that crust should have a distinct, confident JIGGLE. Think wobble, not wave. It will continue to set as it cools. Trust the jiggle! Overbaking kills the molten magic, turning it into just a very good brownie pie (still tasty, but not the same!).
- The Patient Cool Down: Carefully remove the pie from the oven (it’ll be hot!). Place it on a wire rack. This is the hardest part: LET IT COOL for at least 30 minutes at room temperature. Why? This resting time allows the molten center to set slightly into a luscious, spoonable lava while the top crackle firms up beautifully. Cutting into it immediately = hot chocolate soup (delicious, but messy!).
Showtime: Serving Your Chocolate Glory
This pie is a showstopper naked, but a little flair never hurts! Let it cool for that crucial 30 minutes (warm, not scorching hot). Dust the dramatic crackle top generously with powdered sugar – it looks like fresh snow on a chocolate landscape. Slice carefully with a sharp knife dipped in hot water (wiping it clean between cuts for neat slices). The star of the show? That molten center oozing out. Serve each slice warm, ideally with a giant scoop of cold, creamy vanilla ice cream melting right on top. The hot/cold, creamy/gooey contrast is mind-blowing. Whipped cream is a delightful second option, or even a drizzle of salted caramel for the overachievers. Grab forks, gather your people, and prepare for the silence that falls when everyone takes their first bite.
Mix It Up: Delicious Twists on the Classic
Once you’ve mastered the classic, try these fun spins!
- Espresso Infusion: Stir 1-2 teaspoons of instant espresso powder into the dry ingredients. Coffee deepens the chocolate flavor without tasting like coffee! A grown-up favorite.
- Peppermint Patty Pie: Add ½ teaspoon peppermint extract with the vanilla. After pouring the filling, sprinkle ½ cup crushed peppermint candies or chocolate mint pieces on top before baking. Festive and refreshing!
- Salted Caramel Swirl: Pour half the filling into the crust. Dollop ¼ cup thick salted caramel sauce over it. Swirl gently with a knife. Top with remaining filling and bake. Ribbons of gooey caramel surprise!
- Nutty Crunch: Fold ½ cup chopped toasted pecans, walnuts, or hazelnuts into the batter just before pouring. Adds fantastic texture.
- Gluten-Free/Dairy-Light: Use a certified GF pie crust and GF flour. Swap the butter for high-quality plant-based butter (sticks, not tubs). Ensure chocolate is dairy-free. Still decadent!
Mason’s Musings & Mishaps
This pie has seen some things in my kitchen! Early on, I was SO paranoid about underbaking that I’d inevitably overbake it, losing that precious molten center. My wife finally staged an intervention, hiding the oven mitts at the 40-minute mark! Lesson learned: Trust. The. Jiggle. I’ve also learned that the type of cocoa powder makes a difference. Dutch-processed gives a slightly darker, smoother flavor I adore, but natural works perfectly too. One memorable Thanksgiving, I forgot the flour entirely. The result? A gloriously rich, impossibly dense chocolate lake in a crust – messy as heck, but devoured with spoons and zero complaints. Sometimes the “mistakes” are the best memories. This recipe is forgiving. Embrace the crackle, celebrate the ooze, and share it with people who appreciate a good chocolate coma. It’s evolved from a date-night gamble to my ultimate comfort food flex.
Your Pie Questions, Answered!
Let’s tackle those common kitchen quandaries:
- Q: My center wasn’t molten! What went wrong?
A: The #1 culprit is overbaking. Remember the jiggle! Ovens vary, so start checking at 38 minutes. It should look set and cracked on top, but the center (about the size of a drink coaster) should wobble significantly when nudged. It sets further as it cools. If slightly overbaked, it’ll still be deliciously fudgy, just not molten. Try reducing the time by 3-5 minutes next bake. - Q: The top cracked, but it sunk a lot in the middle while cooling. Is that normal?
A: Some sinking is totally normal and expected! That dramatic puffiness during baking is partly from air whipped into the eggs. As it cools, that air escapes, and the structure relaxes, especially around the molten center. This creates those gorgeous cracks and the sunken, gooey well of chocolate. Embrace the sink! It’s a sign of molten potential. - Q: Can I make this ahead of time?
A: You have options! For Warm Molten Goodness: Prep the filling and pour into the crust. Cover tightly and refrigerate for up to 24 hours. Bake straight from the fridge, adding 5-7 extra minutes. For Chilled Fudginess: Bake and cool completely. Cover and refrigerate for up to 3 days. Serve cold (intensely fudgy!) or reheat individual slices VERY gently in the microwave (10-15 second bursts) to warm the center. - Q: My filling overflowed! Help!
A: Oh, the chocolate volcano! This usually means the crust was overfilled. Remember to leave that ¼-inch space below the rim. Also, ensure your pie dish is truly 9 inches (some are labeled 9″ but are actually larger). Place a baking sheet on the rack below to catch any potential drips next time. Cleanup is easier than crying over spilled chocolate (mostly!).
Nutritional Info (Per Slice, Approximate)
Calories: ~460 | Carbohydrates: 48g | Fat: 28g (Saturated Fat: 17g) | Sugar: 34g | Protein: 5g | Sodium: 180mg
Note: Nutritional values are estimates and can vary based on specific ingredients used (especially crust type/brand, chocolate, and optional toppings like ice cream).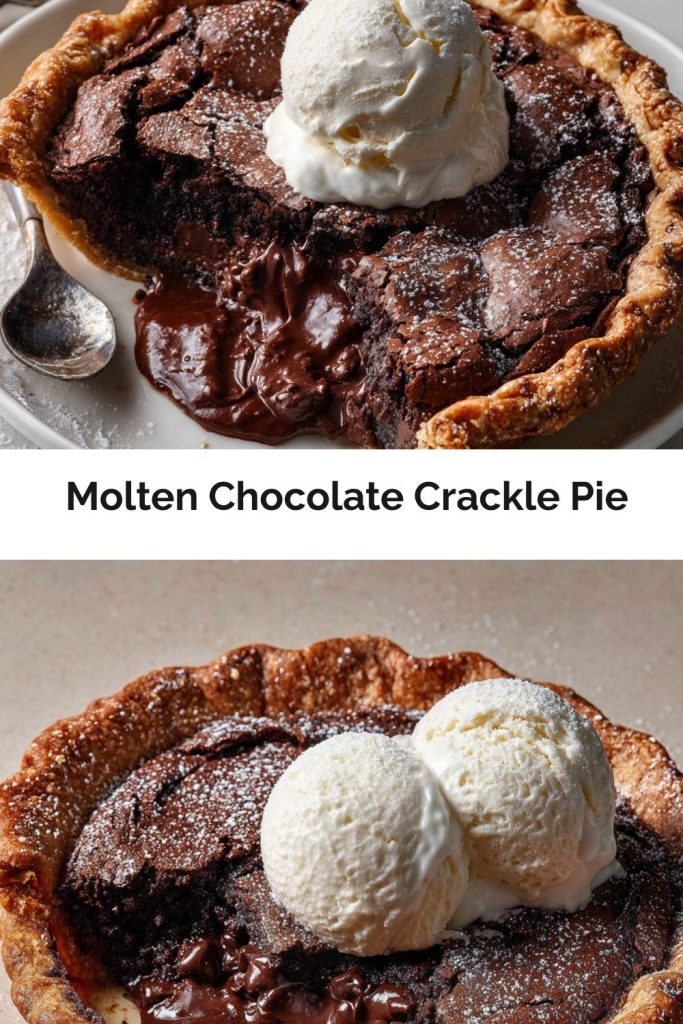
Final Thoughts
This Molten Chocolate Crackle Pie isn’t just dessert—it’s drama, nostalgia, and pure chocolate therapy baked into a crust. It celebrates imperfections, embraces the ooze, and proves that comfort food can still be wildly impressive. Whether it’s the show-stopping crackle top, that spoonful of warm lava center, or the way guests go silent after the first bite, this pie delivers every time.
It’s a love letter to happy kitchen accidents, a tribute to the chocolate lovers among us, and a reminder that joy often comes wrapped in flaky crust and cocoa. So next time life feels a little extra—burnt out, bittersweet, or beautifully chaotic—remember: one pie, one fork, one bite at a time. You’ve got this.


