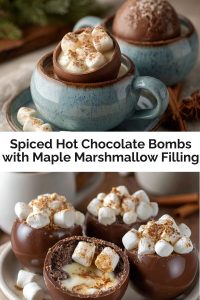
Spiced Hot Chocolate Bombs: Your Cozy Winter Magic Show
Hey friend! Mason Hartman here, back at my digital kitchen table with a steaming mug of inspiration. You know that feeling when a cold wind nips at your nose, and all you crave is a hug in a cup? That deep, soul-warming comfort that only comes from truly great hot chocolate? Well, buckle up, because we’re about to turn that cozy feeling into pure, edible theater. Imagine this: a glossy chocolate sphere, cradled in your favorite mug. You pour hot milk over it, and whoosh – it cracks open like a treasure chest, releasing a cloud of fluffy maple marshmallows and a swirl of rich, spiced cocoa that melts into pure liquid comfort. That’s the magic of these Spiced Hot Chocolate Bombs. They’re not just a drink; they’re a tiny, delicious performance designed for snowy afternoons, frosty evenings, or anytime you need a moment of pure, uncomplicated joy.
I live for recipes that marry simplicity with a little “wow” factor – the kind that make you feel like a kitchen wizard without needing a degree in pastry arts. These bombs are exactly that. They look fancy (seriously, gift these and people will think you’re a confectionery genius), but the process? Totally approachable. We’re talking melted chocolate, a sprinkle of spice, some fluffy marshmallows, and the sheer fun of watching them erupt. It’s the kind of project that’s perfect for a lazy Sunday afternoon, maybe with some tunes playing and a helper (or taste-tester!) by your side. Forget complicated techniques and endless steps. This is about creating warmth, connection, and a whole lot of deliciousness, one melty, marshmallowy bomb at a time. Ready to make some magic? Let’s grab our aprons!
Snow Forts and Stolen Marshmallows: Where This Recipe Began
PrintSpiced Hot Chocolate Bombs with Maple Marshmallow Filling

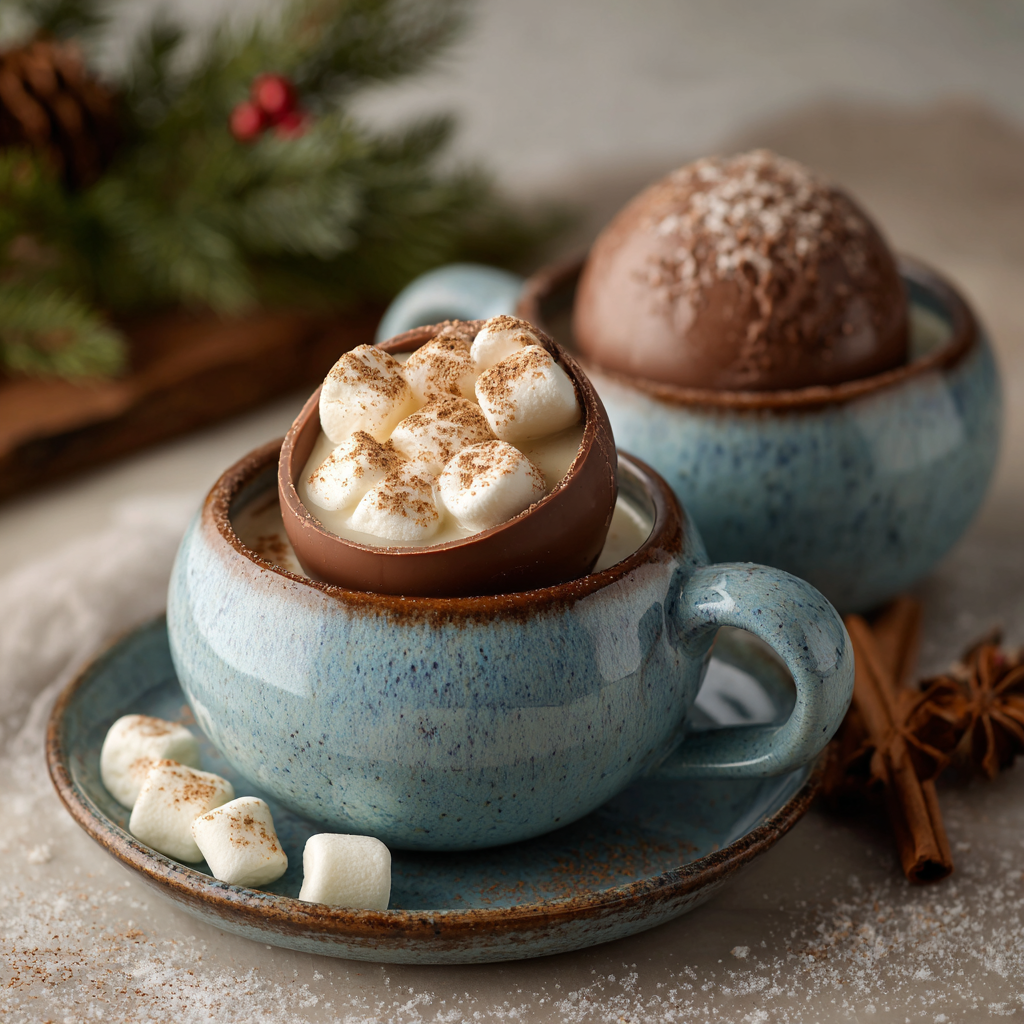
Cozy meets theatrical in these indulgent winter treats — glossy chocolate spheres hiding rich cocoa mix and fluffy maple-scented marshmallows. Pour over steaming milk and watch the magic unfold as they melt, swirl, and release a burst of sweet, spiced comfort. Perfect for gifting or turning any cold day into a warm memory.
- Prep Time: 20 min
- Cook Time: 5 min
- Total Time: 25 min
- Yield: 6 bombs 1x
Ingredients
12 oz semi-sweet or milk chocolate, chopped
½ cup hot cocoa mix
1 cup mini marshmallows (maple-flavored or plain with 1 tsp maple extract)
½ tsp cinnamon
¼ tsp nutmeg
Silicone half-sphere molds
Instructions
Melt chocolate in a microwave-safe bowl (30-sec bursts, stirring each time) or over a double boiler.
Brush or spoon a thick layer into mold halves; chill until firm. Repeat for sturdier shells.
Gently unmold chocolate halves. Fill half with 1–2 tsp cocoa mix, a few marshmallows, and a pinch of cinnamon-nutmeg blend.
Warm a plate slightly; press empty shell halves against it to melt edges, then seal onto filled halves.
To serve, place a bomb in a mug and pour hot milk over — stir and enjoy the reveal.
Nutrition
- Calories: 190
- Fat: 8g
- Carbohydrates: 29g
- Fiber: 2g
- Protein: 2g
This recipe? It’s got roots deep in my frosty childhood memories. Picture it: Northern Michigan, winter break, about eight years old. My brother Ben and I had just spent hours building an epic snow fort – think icy turrets, a tunnel system (highly unstable, but we were fearless!), and numb fingers hidden inside soggy mittens. We’d stumble back inside, shedding layers like wet husks, our cheeks burning red from the cold. Waiting for us was my Grandma Elsie, her kitchen smelling like heaven itself – cinnamon, nutmeg, and rich chocolate. She’d have her big, chipped enamel pot simmering with real hot cocoa, but the real prize was the giant glass jar of homemade maple marshmallows she’d let us fish into. Ben, the little thief, would always try to sneak an extra handful, getting sticky fingerprints everywhere. Grandma would pretend to scold him, her eyes twinkling, before plopping a giant, melting marshmallow mountain into each of our mugs. That first sip after being out in the biting cold? Pure, unadulterated magic. It wasn’t just warmth; it was love, safety, and shared joy. These Spiced Hot Chocolate Bombs are my grown-up, slightly fancier homage to Grandma Elsie’s kitchen magic and those stolen marshmallows. They capture that same feeling of cozy surprise, that burst of sweetness after the chill, and the absolute delight of a treat that feels like a warm hug. Making them always takes me right back to that snow-fort glory.
Gathering Your Chocolatey Arsenal
Okay, team huddle! Here’s everything you need to build your delicious chocolate bombs. Don’t stress – it’s a short list, and I’ve got notes on every item to keep it flexible and foolproof:
- 12 oz Semi-Sweet or Milk Chocolate, Chopped: (Chef’s Insight:) This is your star! Use good quality chocolate bars (like Ghirardelli or Baker’s) chopped up, NOT chocolate chips. Chips have stabilizers that make melting and tempering tricky, leading to dull shells. Semi-sweet gives a lovely depth, while milk chocolate is sweeter and more kid-friendly. Feel like splurging? A dark chocolate (60-70%) makes an amazing grown-up version!
- ½ Cup Hot Cocoa Mix: (Substitution Tip:) Your favorite store-bought mix works great here! For extra richness, use a mix with real cocoa powder listed first. Feeling ambitious? Swap in ¼ cup unsweetened cocoa powder + ¼ cup powdered sugar + tiny pinch of salt for a homemade touch.
- 1 Cup Mini Marshmallows: (Flavor Boost:) The maple is KEY! Hunt down maple-flavored minis (they exist!). If you can’t find them, use plain mini marshmallows + 1 tsp Pure Maple Extract (not pancake syrup!). Toss the plain marshmallows with the extract and let them sit for 10 mins before using – it infuses beautifully!
- ½ tsp Cinnamon + ¼ tsp Nutmeg: (Spice Wisdom:) This warm duo is our “spiced” signature! Cinnamon brings cozy sweetness, nutmeg adds a subtle, earthy warmth. Use freshly grated nutmeg if you can – the flavor is incredible! Feeling adventurous? A tiny pinch of cayenne (⅛ tsp) adds a fantastic “Mexican hot chocolate” kick.
- Silicone Half-Sphere Molds: (Essential Gear:) Non-negotiable! Silicone is flexible, making unmolding a breeze. Get 2-inch diameter spheres for a standard mug bomb. Plastic molds exist but are WAY harder to pop the chocolate out of without cracks. Trust me, silicone is worth it!
See? Simple stuff! The magic is in how we put it together. Let’s get melting!
Crafting Your Chocolate Magic: Step-by-Step
Alright, let’s transform these ingredients into little domes of delight! Don’t let the spherical shape intimidate you. I’ve broken it down with all my favorite hacks to ensure success. Read through first, then let’s dive in!
- Melt the Chocolate Like a Pro: Place your chopped chocolate in a DRY, microwave-safe bowl (glass is best). Microwave in 30-second bursts on 50% power. After each burst, STOP and stir vigorously, even if it looks mostly solid. Residual heat keeps melting it! (Chef Hack: Using 50% power prevents scorching. If you see steam, stop immediately and stir! Overheated chocolate seizes up and turns grainy – if this happens, stir in a teaspoon of vegetable oil to rescue it.) OR, use a double boiler: place the bowl over a pot of barely simmering water (make sure the bowl doesn’t touch the water!), stirring constantly until smooth and glossy. Double boiler is slower but gives more control.
- Building the Chocolate Shells: Using a clean pastry brush (or a small spoon), spread a thick, even layer of melted chocolate inside each cavity of your silicone mold. Get it up the sides! Don’t be shy! This isn’t the time for thin shells – we need sturdiness. (Chef Hack: Hold the mold up to the light after coating. If you see any super thin spots or light shining through, patch it with more chocolate! Thinner spots crack easily.) Pop the mold into the freezer for 5-7 minutes just until firm to the touch. Pull it out and repeat! Apply a second thick layer over the first. This double-layering is CRUCIAL for bombs that hold their shape and don’t crack when sealing. Freeze again for a solid 10 minutes.
- The Grand Unmolding: Gently, GENTLY flex the silicone mold. Start from the edges and push the bottom of each cavity. The firm chocolate half-spheres should pop right out! Handle them by the edges to avoid fingerprint smudges on your beautiful glossy surface. If they stick, freeze for another 5 mins. Place them carefully on a parchment-lined tray. (Chef Hack: Cold hands help! Run your hands under cold water and dry them before handling the shells.)
- Filling the Flavor Bombs: Take half of your chocolate shells – these are the bottoms. Into each one, spoon 1-2 teaspoons of your hot cocoa mix. Then, add a small pile of your maple-infused mini marshmallows (aim for about 1 tablespoon, but don’t overstuff!). Finally, sprinkle over a tiny pinch of your cinnamon-nutmeg blend. The top shells stay empty for now!
- The Art of the Seal (No Superglue Needed!): This is the make-or-break step! Grab a heatproof plate and run it under very hot water for a minute. Dry it COMPLETELY – water is chocolate’s enemy! You just want the plate warm, not wet. Working quickly with one bomb at a time: Take an empty top shell and firmly press its open edge flat against the warm plate for just 3-5 seconds. This melts the edge slightly. Immediately lift it and carefully, precisely align it with the edge of a filled bottom shell. Press down gently but firmly for a few seconds. The melted edges should fuse together as they cool! (Chef Hack: If your kitchen is warm, work near the freezer! If the seal feels weak after pressing, use your fingertip to gently smooth a tiny bit of extra melted chocolate around the seam like edible caulk. Chill again to set.) Repeat for all bombs. Pop them back in the fridge for 5 minutes to fully set the seal.
And voila! You’ve just crafted edible winter magic. Admire those glossy orbs!
Unleashing the Magic: How to Serve
This is the BEST part! Place one beautiful Spiced Hot Chocolate Bomb gently into the bottom of your favorite big mug. Heat up your milk (whole milk or oat milk work beautifully) until it’s steaming hot – just below boiling. Slowly, dramatically, pour the hot milk directly over the bomb. Watch the magic unfold! The chocolate shell will melt away, revealing the cocoa mix and marshmallows. The marshmallows will puff up and start to melt, swirling that gorgeous maple scent into the rich, spiced chocolate. Give it a gentle stir to combine everything into a perfectly smooth, decadent, marshmallow-clouded cup of pure comfort. Grab a blanket, curl up, and savor every sip. It’s pure winter joy in a mug.
Shake Things Up! Creative Twists
Got the basics down? Awesome! Now let’s play. These bombs are a fantastic canvas for your flavor experiments:
- Peppermint Patty: Use dark chocolate for the shell. Fill with cocoa mix and crushed peppermint candies or mini peppermint marshmallows instead of maple. A drop of peppermint extract in the filling kicks it up!
- Salted Caramel Dream: Use milk chocolate. Fill with cocoa mix, mini marshmallows, and add 2-3 soft caramel bits or a small drizzle of thick salted caramel sauce before sealing.
- Mocha Madness: Add 1-2 teaspoons of instant espresso powder to your hot cocoa mix filling. Perfect for coffee lovers!
- White Chocolate Chai: Swap semi-sweet for white chocolate shells. Mix ½ tsp chai spice blend (ginger, cardamom, cloves, cinnamon) into the cocoa mix filling. Use plain mini marshmallows.
- Vegan Delight: Use high-quality vegan dark or milk chocolate. Ensure your cocoa mix and marshmallows are vegan (Dandies minis are great!). Fill as usual!
Don’t be afraid to mix and match spices or add-ins – that’s where the fun is!
Mason’s Musings & Mishaps
Oh, the stories these chocolate spheres could tell! My first batch? Absolute chaos. I used cheap chocolate chips (mistake #1), didn’t layer the shells (mistake #2), and tried sealing them with a hairdryer (mistake #3 – melted the whole thing!). I ended up with more chocolate on my hands than in the molds and a kitchen that looked like a cocoa powder bomb went off. But hey, that’s how we learn, right? After some stubborn tinkering (and swearing), I cracked the code: good chocolate, double layers, and the warm plate trick. The maple marshmallow filling was a later brainwave, inspired by Grandma Elsie’s jar. It adds that extra layer of cozy sweetness that just feels special. Now, making these bombs is pure joy. I love packaging them up in little cellophane bags with ribbon for neighbors or friends – it’s instant holiday cheer! Remember, cooking isn’t about perfection; it’s about the fun, the connection, and the delicious results (even if they’re a little lopsided sometimes!). If my chocolate-smeared kitchen disasters led to this recipe, I’d say it was worth every messy minute.
Hot Chocolate Bomb SOS: Your Questions Answered
Okay, let’s tackle some common bumps in the chocolatey road. Don’t worry, I’ve been there!
- Q: My chocolate shells cracked when I unmolded them! Help!A: Cracks usually mean the shell was too thin or it got too warm before unmolding. Fix it: Next time, ensure you apply TWO thick layers (see Step 2!). Also, make sure your freezer is cold enough and let the shells chill fully between layers and before unmolding. If
 Final Thoughts
Sweet, toasty, and a little messy—these waffle sandwiches are pure joy on a plate. Leftovers or not, they’ll turn any day into a cozy celebration. Grab your waffle iron and let the magic happen!