Get Ready to Bake the Spookiest, Chewiest, Most Chocolatey Halloween Cookies Ever!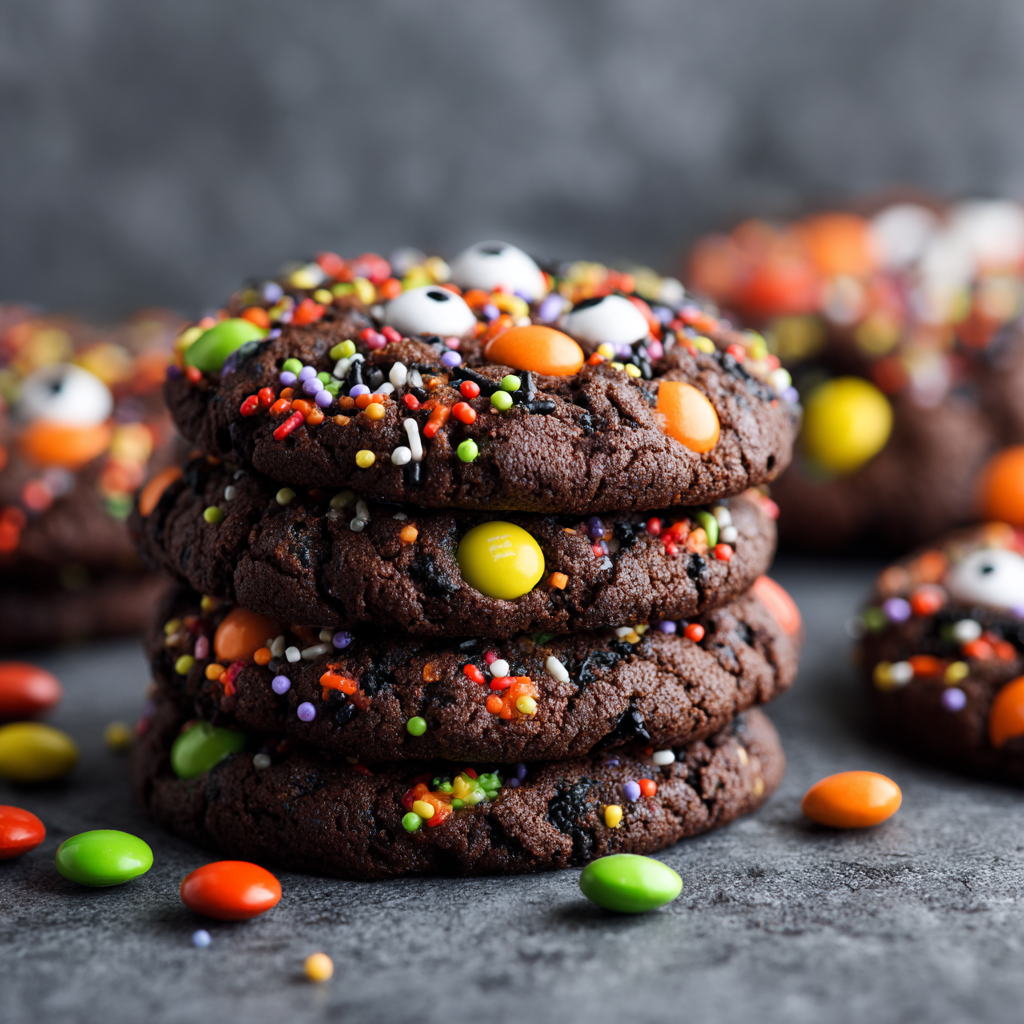
Hey friends, Mason here! Can you smell that? It’s the unmistakable scent of chocolate and childhood excitement wafting through crisp autumn air. Halloween’s rolling in like a foggy graveyard mist, and you know what that means – it’s time to trade your spatula for a magic wand and bake up some edible mischief! Today, we’re conjuring my Spooky Halloween Double Chocolate Cookies – the kind that disappear faster than a ghost in a haunted house. Imagine sinking your teeth into a cookie that’s crackly on the edges, fudgy in the middle, and packed with crunchy sprinkles, vibrant M&M’s, and googly candy eyeballs staring back at you. These aren’t just cookies; they’re edible Halloween joy. Perfect for party platters, trick-or-treat fuel, or munching during your annual Hocus Pocus rewatch. No fancy skills needed – just butter-stained fingers and a sense of fun. So grab your favorite mixing bowl (the one that’s seen a few kitchen disasters, we’ve all got one), and let’s turn your kitchen into a monster mash of deliciousness!
That Time I Nearly Summoned Cookie Monsters (Literally)
PrintSpooky Halloween Double Chocolate Cookies

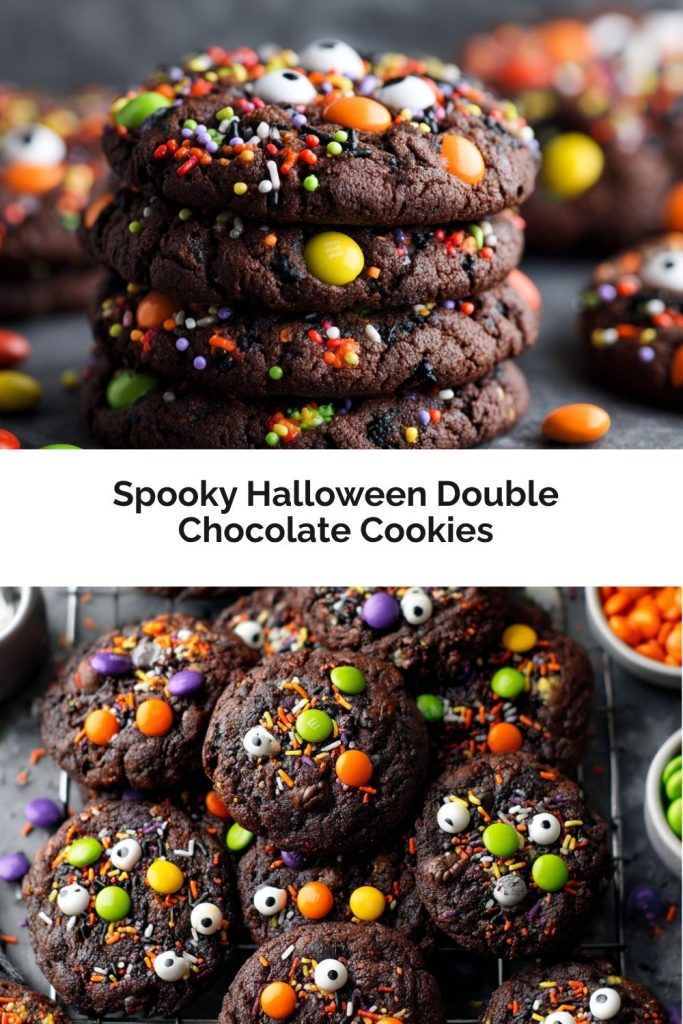
Get ready to bake the ultimate Halloween treat—soft, chewy cookies packed with rich black cocoa, festive Halloween M&M’s, and crunchy sprinkles, all brought to life with candy eyeballs. Perfect for parties, trick-or-treating, or a cozy night in with a spooky movie. Let’s bake up some magic!
- Prep Time: 20 mins
- Cook Time: 12 mins
- Total Time: 32 mins
Ingredients
2 1/2 cups (312 g) all-purpose flour, spooned and leveled
10 tbsp (70 g) black cocoa powder
1 tsp baking powder
1 tsp baking soda
1 tsp salt
1 1/2 cups (336 g) unsalted butter, softened
1 1/2 cups (330 g) light brown sugar, packed
1/2 cup (100 g) granulated white sugar
4 egg yolks, at room temperature
2 tsp vanilla extract
1 1/2 cups (340 g) Halloween M&M’s
6 tbsp (72 g) Halloween jimmies (sprinkles)
Candy eyeballs, for decoration
Extra Halloween M&Ms and jimmies for topping
Instructions
Preheat oven to 350°F (175°C) and line baking sheets with parchment paper.
In a bowl, whisk together flour, cocoa powder, baking powder, baking soda, and salt.
In a large bowl, cream the butter with both sugars until light and fluffy.
Mix in the egg yolks and vanilla until well combined.
Gradually add the dry ingredients to the wet, mixing until a dough forms.
Fold in the M&M’s and jimmies.
Scoop dough (about 2 tbsp each) onto the baking sheet, spacing them apart.
Press extra M&M’s, jimmies, and candy eyeballs on top.
Bake for 10–12 minutes, or until edges are set but centers are still soft.
Cool on the pan for 5 mins, then transfer to a wire rack.
Nutrition
- Calories: 210
- Fat: 11g
- Carbohydrates: 27g
- Protein: 2g
Picture this: It’s 2018, my tiny apartment kitchen looks like a candy bomb went off. I’m testing these cookies for my first-ever Halloween potluck. In my enthusiasm, I dump in a whole extra cup of sprinkles because… well, more is more, right? Wrong. As they baked, rainbow ooze erupted everywhere, turning my cookies into crispy lace doilies with M&M’s peeking through like trapped souls. My then-boyfriend (now husband) took one bite and deadpanned, “Babe, did you bake these or perform an exorcism?” We laughed so hard we cried, ate the ugly-but-tasty crumbs straight off the pan, and learned a golden rule: sprinkles are fabulous gremlins – best used with restraint. That messy batch became our tradition; now we purposely bake one “franken-cookie” overflowing with toppings as our silly homage to kitchen fails. Because sometimes, the best memories come from the sweetest disasters.
Your Ghoulish Gathering: Ingredients & Why They Matter
Think of these as your spellbook components – each plays a crucial role in the cookie magic! Pro tip: Measure your flour by spooning it into the cup and leveling it off with a knife. Dunking the cup straight into the bag is like inviting a dough vampire – it’ll suck in too much and make your cookies dry.
- All-purpose flour (2 1/2 cups / 312g): The trusty skeleton of our cookie. Want extra chew? Swap 1/4 cup with bread flour! Gluten-free? A 1:1 GF blend works great.
- BLACK cocoa powder (10 tbsp / 70g): Not regular cocoa! This Dutch-processed beast gives that deep, inky color and Oreo-like flavor. Find it online or in specialty stores. In a pinch? Use regular dark cocoa, but expect lighter cookies.
- Baking powder + Baking soda (1 tsp each): Our rising ghosts! Baking soda = spread, baking powder = lift. Together, they create the perfect chewy thickness.
- Salt (1 tsp): The flavor enhancer – makes the chocolate sing! Use fine sea salt.
- Unsalted butter, softened (1 1/2 cups / 336g): Softened = cool to the touch but dents easily. Melted butter makes flat cookies! Salted butter works too – just reduce added salt to 1/2 tsp.
- Light brown sugar (1 1/2 cups / 330g) + Granulated sugar (1/2 cup / 100g): Brown sugar = moisture + chew + caramel notes. White sugar = crisp edges. Pack that brown sugar tight!
- EGG YOLKS ONLY (4 yolks): My secret weapon! Yolks add richness and chew without the cakey texture whites can bring. Save the whites for meringue ghosts!
- Vanilla extract (2 tsp): The flavor backbone. Use real stuff – imitation tastes like plastic pumpkins.
- Halloween M&M’s (1 1/2 cups / 340g): The colorful crunch! Use any seasonal variety. Freeze them for 10 mins before mixing to prevent bleeding.
- Halloween jimmies/sprinkles (6 tbsp / 72g): Jimmies (long sprinkles) hold color better than nonpareils (tiny balls) in baking. Avoid “natural” dyes – they turn muddy!
- Candy eyeballs + extra M&M’s/jimmies for topping: Press these on *after* scooping – they’re our edible personality!
Brewing the Magic: Let’s Bake These Monsters!
Ready? Aprons on! This isn’t rocket science – it’s cookie alchemy. Follow these steps, toss in some enthusiasm, and you’re golden.
- Preheat & Prep: Crank that oven to 350°F (175°C). Line baking sheets with parchment paper – trust me, skipping this is a cleanup nightmare. Chef’s Hack: Got only 1-2 pans? Cool them under cold water between batches so dough doesn’t melt prematurely.
- Whisk the Dry Crew: In a medium bowl, whisk together flour, black cocoa, baking powder, baking soda, and salt. Break up any cocoa lumps! Whisking = even distribution = no bitter pockets. Set aside.
- Cream the Butter & Sugars: In a large bowl, beat softened butter, brown sugar, and granulated sugar with an electric mixer (or serious elbow grease) for 3-4 minutes. You want it LIGHT and FLUFFY – pale and creamy. This incorporates air for lift! Chef’s Tip: Scrape the bowl halfway through. Hidden butter clumps are cookie saboteurs.
- Egg Yolks & Vanilla Party: Add egg yolks one at a time, mixing well after each. Then pour in the vanilla. Mix until just combined – don’t overbeat here. The mix should look smooth and glossy.
- Marry Wet & Dry: Gradually add your dry ingredients to the wet mix on LOW speed (unless you enjoy cocoa snowstorms). Mix until *just* combined – a few flour streaks are okay! Overmixing = tough cookies.
- Fold in the Fun: Toss in M&M’s and sprinkles. Use a spatula to GENTLY fold until distributed. Be swift – sprinkles bleed color if you manhandle them!
- Scoop & Decorate: Use a 2-tablespoon cookie scoop (or a spoon) to drop dough onto sheets, spacing them 3 inches apart – they spread! Press extra M&M’s, sprinkles, and 3-4 candy eyeballs onto each mound. Chef’s Hack: Roll dough balls slightly taller than wide for thicker cookies.
- Bake with Confidence: Bake 10-12 minutes. They’re done when edges look set but centers still seem soft and slightly underbaked. KEY TRICK: Pull them out at 10 mins even if they look doughy! They firm up as they cool. Overbaking kills the chew.
- Cool Like a Pro: Let cookies cool on the pan for 5 minutes (they’re still setting!). Then transfer to a wire rack. Resisting snagging one now is the real horror story… but patience rewards you with perfect texture!
Unleashing Your Creations: Serving Up the Spook
Presentation is half the fun! Stack these cookies high on a rusty cake stand (hit the dollar store for cheap thrills) or pile them into a hollowed-out plastic cauldron. For a midnight vibe, serve them on black parchment with dry ice swirling below (keep it away from kids!). Pair with cold glasses of milk dyed purple with food coloring or spooky-themed hot cocoa. Hand them out to trick-or-treaters in little cellophane bags tied with orange ribbon – instant neighborhood legend status!
Shape-Shift Your Cookies: 5 Frightfully Fun Twists
Got allergies or just feeling adventurous? Let’s morph these monsters:
- Peanut Butter Poltergeists: Swap 1/2 cup flour for peanut powder. Fold in Reese’s Pieces instead of M&M’s.
- Gluten-Free Ghouls: Use a 1:1 GF flour blend (like Bob’s Red Mill). Guaranteed to vanish!
- Minty Monster Mash: Add 1/2 tsp peppermint extract with the vanilla. Use Andes mints bits instead of some M&M’s.
- Salted Caramel Skeletons: Press a soft caramel cube into each dough ball before baking. Sprinkle with flaky sea salt after baking.
- Oreo Graveyard: Fold in 1 cup crushed Oreos. After baking, stick Milano cookie “tombstones” decorated with icing RIP messages into warm cookies.
Mason’s Midnight Snack Confessions
These cookies have evolved more than a werewolf at full moon! Originally, I used regular cocoa… yawn. Discovering black cocoa was like finding a secret potion. And those eyeballs? Total accident. I knocked a tub into the batter once and yelled, “They’re ALIVE!” – and a star was born. Pro-tip: The dough freezes beautifully! Scoop balls onto a tray, freeze solid, then bag them. Bake straight from frozen (add 1-2 mins). Perfect for last-minute boo-tiful cravings. Remember, baking is about joy, not perfection. If your eyeballs slide off or a cookie looks like Frankenstein’s forehead? That’s character. (And honestly, the ugly ones taste just as wicked).
Your Cookie Cauldron: Fixing Common Spooky Surprises
Got questions? I’ve brewed up answers!
- “My cookies spread into flat ghosts!” Ah, the dreaded pancake spook! Likely culprits: Butter too warm (should be cool, not melty), hot baking pans (cool between batches!), or expired leavening (baking soda/powder lose oomph after 6 months). Chilling dough 30 mins pre-baking also helps.
- “Why did my sprinkles turn the dough gray?” Sprinkles are sneaky little color-bleeders! Fold them in GENTLY at the very end, use jimmies not nonpareils, and freeze them first. If it happens? Call them “Witch’s Brew” cookies and own it!
- “Can I use whole eggs instead of just yolks?” Technically yes, but expect cakier, less fudgy cookies. The yolks are our chew-masters! Save those whites for a spooky pavlova.
- “My candy eyeballs melted! Help!” You might be pressing them in too deep! Just gently place them on TOP right before baking. If your oven runs hot, add them AFTER baking (use dot of icing as “glue”). Or, embrace the gooey-eyed zombie look!
Nutritional Spellbook (Per Cookie, Approx.)
Calories: 210 | Fat: 11g | Carbs: 27g | Protein: 2g
Prep Time: 20 mins | Cook Time: 12 mins | Total Time: 32 mins
Note: Values are estimates. Actual nutrition depends on exact ingredients and cookie size. Enjoy responsibly… or not, it’s Halloween!
Final Thoughts: Bake Mischief, Make Magic
And just like that – you’ve summoned the spookiest batch of cookies this side of the pumpkin patch. Whether yours came out perfectly round or deliciously lopsided, these Halloween double chocolate cookies aren’t just about the sugar rush – they’re about the laughs, the memories, and the joy of making edible chaos with the people you love (or solo with a good playlist and a glass of wine – no judgment).
Remember: the best bakes aren’t the most perfect – they’re the ones that make you smile. So if your candy eyeballs slid off or your sprinkle game got a little out of hand? Own it. That’s charm. That’s personality. That’s what makes your kitchen feel alive this time of year.
So go forth, cookie wizard – pack up a few for your coven, stash one or two for yourself (because obviously), and may your Halloween be full of chewy centers, crispy edges, and just the right amount of spooky.