When Waffles Get a Sweet Potato Hug (and a Marshmallow High-Five!)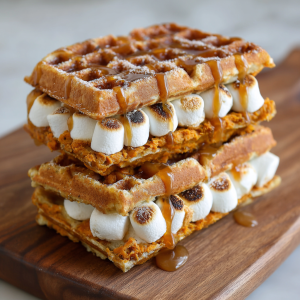
Hey friends, Mason here! Let’s be real: sometimes breakfast needs a little sparkle. And dessert? Well, dessert could always use a cozy sweater. That’s where these Sweet Potato & Marshmallow Waffle Sandwiches waltz in – they’re like your favorite holiday sweet potato casserole decided to crash a waffle party, and honestly? We’re all winners here. Imagine fluffy, spice-kissed waffles hugging a pillow of toasted marshmallows, dripping with golden caramel… handheld happiness that’s equal parts brunch superstar and after-dinner showstopper.
No fancy chef hat required – just your trusty waffle iron and that beautiful urge to make something deliciously fun. This isn’t about perfection; it’s about that moment when you bite in, the marshmallows stretch like edible sunshine, and someone at the table inevitably says, “Oh WOW.” Whether it’s a lazy Saturday morning, Friendsgiving brunch, or a “treat yo’self” weeknight moment, these sandwiches are your edible high-five. Ready to turn chaos into delicious? Let’s fire up that iron!
The Accidental Brunch Hero: How These Sandwiches Saved Thanksgiving Leftovers
PrintSweet Potato & Marshmallow Waffle Sandwiches

A playful twist on a holiday classic — fluffy waffles infused with sweet potato purée, sandwiched around gooey toasted marshmallows, then drizzled with golden caramel. It’s part breakfast indulgence, part dessert decadence, and 100% fall comfort in handheld form. Perfect for brunch spreads or a sweet ending to dinner.
- Prep Time: 15 min
- Cook Time: 15 min
- Total Time: 30 min
- Yield: 4 sandwiches 1x
Ingredients
1 cup mashed sweet potato (about 1 medium, cooked & puréed)
1½ cups all-purpose flour
2 tbsp brown sugar
2 tsp baking powder
½ tsp cinnamon
¼ tsp nutmeg
¼ tsp salt
1 cup milk
2 large eggs
¼ cup melted butter
1 cup mini marshmallows
¼ cup caramel sauce
Instructions
Preheat waffle iron.
In a bowl, whisk flour, brown sugar, baking powder, cinnamon, nutmeg, and salt.
In another bowl, combine sweet potato, milk, eggs, and melted butter. Stir into dry ingredients until just combined.
Cook waffles according to waffle iron instructions until golden and crisp.
Place mini marshmallows on one waffle half; toast with a kitchen torch or under broiler until melty.
Sandwich with another waffle, drizzle with caramel, and serve warm.
Nutrition
- Calories: 420
- Fat: 14g
- Carbohydrates: 68g
- Fiber: 3g
- Protein: 8g
Okay, story time. Picture this: It’s the day after Thanksgiving, my fridge is bursting with leftovers, and my niece, Chloe (age 7, chief taste-tester and critic), announces she’s “bored of turkey.” Challenge accepted. We had a mountain of sweet potato casserole and a rogue bag of marshmallows. “Uncle Mason,” she says, eyes wide, “Can we make waffle houses?” Inspiration struck!
We mashed those sweet potatoes right into my usual waffle batter, piled on marshmallows, and toasted them under the broiler. When that caramel sauce drizzled over the top? Pure magic. Chloe declared them “better than Santa’s cookies,” and a tradition was born. Now, these waffle sandwiches are our mandatory post-Thanksgiving brunch, a messy, sticky, glorious reminder that the best recipes often start with a fridge full of leftovers and a kid’s wild imagination. Food memories? We’re making ’em!
Your Flavor Toolkit: What You’ll Need
Gather your squad! These ingredients are pantry heroes with room for improvisation:
- 1 cup mashed sweet potato (about 1 medium, cooked & puréed): The cozy heart! Use leftover baked sweet potatoes (skin removed!) or steam/cube & boil fresh ones until fork-tender. Pro Tip: Canned puree works in a pinch, but drain excess liquid!
- 1½ cups all-purpose flour: The trusty base. For fluffier waffles, swap in ½ cup whole wheat pastry flour.
- 2 tbsp brown sugar: Deep, molasses-y sweetness. Pack it in! Maple sugar is a fun swap.
- 2 tsp baking powder: Our lift-off agent! Make sure it’s fresh for maximum puff.
- ½ tsp cinnamon, ¼ tsp nutmeg, ¼ tsp salt: The warm spice hug! Don’t skip the salt – it balances everything. Add a pinch of ginger or cardamom if you’re feeling fancy.
- 1 cup milk: Any kind you love! Dairy, almond, oat – they all play nice here.
- 2 large eggs: Binders and richness champions. For vegan, try flax eggs (2 tbsp ground flax + 5 tbsp water, sit 5 min).
- ¼ cup melted butter: Flavor and crispness! Cool it slightly before adding. Vegan butter or coconut oil work too.
- 1 cup mini marshmallows: The gooey glory! Minis melt perfectly. Vegan marshmallows? Absolutely!
- ¼ cup caramel sauce: The golden ribbon! Store-bought is easy, homemade is divine (try my 10-min stovetop version linked below!). Salted caramel is *chef’s kiss*.
Let’s Build Some Waffle Magic: Step-by-Step
- Preheat Your Waffle Iron (Medium-High): Crank it up! A hot iron = crispy waffles. Give it a light brush of oil or non-stick spray if needed. Chef Hack: Place a baking sheet in your oven on its lowest setting – this keeps cooked waffles warm and crisp!
- Whisk the Dry Crew: In a large bowl, whisk together the flour, brown sugar, baking powder, cinnamon, nutmeg, and salt. Get ’em mingling! Insight: Whisking = air = lighter waffles. Don’t skip it!
- Unite the Wet Team: In another bowl, whisk the mashed sweet potato, milk, eggs, and melted butter until smooth(ish). A few sweet potato lumps are totally fine – character!
- Bring the Batter Together: Pour the sweet potato mixture into the dry ingredients. Gently stir with a spatula just until combined. Lumps are okay! Overmixing = tough waffles. Think “shaggy batter,” not smooth pancake batter. Chef Hack: Let the batter rest 5 minutes while the iron heats fully – it relaxes the gluten for tender waffles.
- Waffle Time!: Ladle batter onto the hot iron (amount depends on your iron size – fill without overflowing). Close and cook according to your iron’s instructions, usually 3-5 minutes, until deeply golden, crisp, and steaming stops. Pro Tip: Resist peeking too early! Let that steam work.
- Marshmallow Meltdown: Place one waffle half on a heatproof surface or baking sheet. Scatter mini marshmallows evenly over it. Toast with a kitchen torch until golden and gooey, OR place under a broiler for 30-60 seconds (WATCH CLOSELY – they burn fast!).
- Sandwich & Drizzle: Immediately top the melty marshmallow waffle with another waffle half. Press down gently. Drizzle generously with warm caramel sauce. Chef’s Whisper: Do this while the marshmallows are still molten for maximum ooze factor.
- Serve STAT!: These are best enjoyed immediately while the waffles are crisp, the marshmallows are stretchy, and the caramel is flowing! Grab napkins. Lots of napkins.
How to Serve Up the Happiness
Presentation is part of the fun! Plate these beauties on a simple wooden board or colorful plate. For extra pizzazz:
- Dust lightly with powdered sugar or cinnamon sugar.
- Add a tiny scoop of vanilla ice cream on the side (it melts into the waffle crevices… heavenly!).
- Serve with extra caramel sauce for dipping (because more is more!).
- Crispy bacon on the side? Sweet + salty = perfection.
They’re messy, joyful, and meant to be eaten with your hands (and maybe a fork for backup!).
Mix It Up! Delicious Twists & Swaps
Got an idea? Run with it! Here are some spins:
- Pecan Praline Power: Stir ½ cup chopped toasted pecans into the batter. Drizzle with praline sauce instead of caramel!
- Chocolate Dream: Add ⅓ cup cocoa powder to the dry ingredients. Use chocolate chips instead of *some* marshmallows. Drizzle with chocolate sauce AND caramel.
- Grown-Up Gourmet: Whisk 1 tbsp bourbon or spiced rum into the caramel sauce. Top sandwiches with a sprinkle of flaky sea salt.
- Gluten-Free Goodness: Swap the AP flour for a 1:1 gluten-free baking blend (ensure it has xanthan gum).
- Mini Marvels: Use a mini waffle iron to make bite-sized sandwiches – perfect for parties!
Mason’s Musings & Mishaps
These waffles have seen some things! That first batch with Chloe? We used *big* marshmallows. Mistake. They melted into a single, un-toastable blob under the broiler. Mini marshmallows are non-negotiable for even melting!
Over the years, I’ve learned the batter thickness is key. Too thick? Dense waffles. Too thin? They spread everywhere in the iron. The sweet spot is like a thick cake batter – it should dollop, not pour. If it feels too thick, add a *splash* more milk. Too thin? A sprinkle more flour.
The biggest evolution? The caramel. I started with jarred stuff (no shame!), but making a quick 10-minute caramel sauce with brown sugar, butter, and cream? Game-changer. It’s richer and balances the sweetness better. Find my easy recipe on the blog! Remember, cooking is play. Burned a waffle? Call it “extra crispy” and load on the marshmallows. Laugh, eat, repeat.
Your Questions, Answered (Before You Even Ask!)
Q: My waffles are soggy! Help!
A: Sogginess is usually the enemy of a good waffle sandwich! Causes & Fixes:
- Iron Not Hot Enough: Preheat for a solid 10 minutes. Test with a drop of water – it should sizzle and dance.
- Overfilled Iron: Too much batter creates steam that can’t escape, steaming the waffle. Use slightly less batter.
- Stacking Hot Waffles: Trapped steam makes them soft. Keep them in a single layer on a rack in a warm oven.
- Undercooked: Cook until the steam stops dramatically escaping and the waffle is deep golden brown.
Q: Can I make the waffles ahead?
A: Absolutely! Cook waffles completely, let them cool on a wire rack, then freeze in a single layer before bagging. Reheat straight from frozen in a toaster or toaster oven until hot and crisp. Then add marshmallows and caramel fresh!
Q: No kitchen torch or broiler? How do I melt the marshmallows?
A: Get creative! You can:
- Place marshmallows on a waffle half and microwave VERY briefly (5-10 seconds) – watch closely, they expand fast!
- Assemble the sandwich *without* toasting, then warm the whole thing in a 350°F oven for 5-7 minutes until marshmallows soften.
Q: My batter seems super thick. Is that right?
A: Sweet potato adds density, so yes, it will be thicker than plain waffle batter! It should be scoopable and hold its shape roughly, not pour like water. If it feels like stiff cookie dough, add a tablespoon or two more milk.
Nutritional Snapshot (Per Sandwich, Approx.)
Calories: 420 | Protein: 8g | Carbs: 68g | Fat: 14g | Fiber: 3g
Prep Time: 15 min | Cook Time: 15 min | Total: 30 min | Servings: 4 sandwiches

Final Thoughts
Sweet Potato & Marshmallow Waffle Sandwiches aren’t just a recipe — they’re a mood, a memory, and a little bit of magic squished between golden, crispy edges. They’re proof that leftovers can turn into legends, and that the best dishes are often born from a “why not?” moment. Whether you’re feeding a post-holiday crew, spoiling yourself on a random Tuesday, or making a kid’s wild kitchen idea come true, these sandwiches deliver comfort, joy, and just the right amount of sticky chaos. So grab your waffle iron, embrace the mess, and let the marshmallows do their happy dance — because life’s too short for boring brunch.
`, `