Garlic & Herb Pickled Veggie Sticks: Your New Crunchy Obsession
Hey there, snack squad! 👋 Picture this: It’s a sweltering summer afternoon, and you’re rummaging through your fridge for something crisp, zesty, and downright refreshing. Your hand lands on a jar of rainbow-bright veggie sticks swimming in a garlicky, herb-infused brine. You pop one in your mouth, and bam—it’s like a flavor fireworks show. Tangy, crunchy, and just a little spicy. That, my friends, is the magic of homemade Garlic & Herb Pickled Veggie Sticks.
I’m not gonna lie—I’ve always been a pickle fanatic. Like, the kind of person who could eat a whole jar of pickles and still go looking for more. But when my garden started overflowing with carrots, green beans, and asparagus, I knew I had to level up my preserving game. Canning sounded like a whole production, so I set out to create a quick-pickle recipe that was stupid-easy, totally customizable, and utterly snackable. Enter: this crunchy masterpiece.
These veggie sticks quickly became my go-to for everything: snacking, garnishing Bloody Marys, jazzing up grain bowls, or adding pizzazz to cheese boards. They’re also the star of my midnight fridge raids—no shame in that game. And the best part? You don’t need any fancy equipment. No water baths, no pressure canners, no thermometers. Just a few fresh veggies, a simple brine, and a little fridge time.
Ready to turn your fridge into a pickle paradise? Let’s do this.
Garlic & Herb Pickled Veggie Sticks
The Pickle Jar That Started It All
My love affair with pickling began at age 10, thanks to my Italian grandma, Nonna Sophia. Her basement was like stepping into another world—shelves lined with mason jars filled with jewel-toned vegetables, preserved in all their tangy glory. Tomatoes, banana peppers, pickled garlic cloves, eggplant in oil—you name it, she pickled it. But the crown jewel was always her giardiniera—a spicy, crunchy Italian veggie medley that could wake up any sandwich.
One summer, after helping her clean and trim piles of fresh veggies, she handed me a jar of neon-pink pickled radishes, cracked the lid, and said, “Mangia, bambina! Food should make your tongue dance!” And let me tell you, it did. That tangy crunch hit different. I was hooked.
Fast-forward to my first solo apartment, where I decided I could recreate Nonna’s magic. Spoiler alert: I could not. My early pickling attempts ranged from passable to outright weird (there was a balsamic blueberry incident that still haunts me). But I kept at it, tweaking ingredients, experimenting with herbs, and eventually landed on this garlic-herb brine that changed everything.
Now, every time I hear that satisfying pop of a jar lid, I’m right back in Nonna’s kitchen, barefoot and giddy, stealing olives from her apron pockets.
What You’ll Need (And Why It Works)
Here’s the magic lineup of ingredients. Each one brings something special to the pickle party:
-
Rainbow carrots – Not just pretty to look at; they’re sweet, crisp, and soak up brine like champs. You can absolutely use regular orange carrots, but the color pop from rainbow varieties? Chef’s kiss.
-
Asparagus tips or green beans – Choose your fighter. Asparagus adds elegance and a slightly nutty flavor; green beans are classic and mega crunchy. Both are perfect brine carriers.
-
Garlic cloves, smashed – Don’t mince! Smashed cloves release more flavorful oils into the brine. You want bold garlic flavor, not a mellow whisper.
-
Fresh rosemary – Earthy, piney, aromatic. Rosemary makes everything taste a little fancier. If you’re in a pinch, dried rosemary will do (½ tsp per jar), but fresh really makes this brine sing.
-
Crushed peppercorns – These add subtle spice and complexity. You don’t need a fancy spice grinder—just crush whole peppercorns with a rolling pin inside a zip-top bag. Instant upgrade.
-
White vinegar – Clean, sharp, and reliable. You can also use rice vinegar for a gentler tang. Apple cider vinegar works too, but it gives a fruitier finish.
-
Sugar & salt – Balance is everything. The sugar tempers the vinegar’s sharpness, and the salt seasons the veggies. If you’re cutting back on sugar, swap it for honey, maple syrup, or monk fruit sweetener.
Optional extras? A pinch of turmeric for golden brine (it’s mostly for looks, but it’s pretty), red pepper flakes for heat, or smoked paprika for a touch of campfire magic.
Let’s Get Picklin’!
This recipe makes enough for about 2 to 3 pint jars, depending on how tightly you pack your veggies. Feel free to scale up or down based on your veggie haul.
Step 1: Blanch Those Veggies (Optional but Genius)
Bring a large pot of water to a boil. Meanwhile, prepare an ice bath (big bowl of ice water). Dunk your carrot sticks, green beans, or asparagus tips into the boiling water for 1–2 minutes, just until their colors brighten slightly. Then plunge them into the ice bath to stop the cooking.
Why blanching? Because it halts enzymes that can make veggies soft over time. You get better texture, brighter color, and longer-lasting crunch. Just don’t overdo it—mushy veggies are the enemy of a good pickle.
Drain thoroughly and pat dry. Moisture = diluted brine, and we want that punchy flavor front and center.
Step 2: Brine Time, Baby
In a saucepan, combine:
-
1 cup white vinegar
-
1 cup water
-
1 tablespoon sugar
-
1 tablespoon kosher salt
-
3–4 smashed garlic cloves
-
1–2 sprigs fresh rosemary
-
1 teaspoon crushed peppercorns
Bring to a gentle simmer over medium heat, stirring until sugar and salt dissolve (about 3–4 minutes). If you’re going for gold (literally), toss in ¼ tsp turmeric. Let the brine cool slightly—it should be warm, not boiling, when you pour it over the veggies.
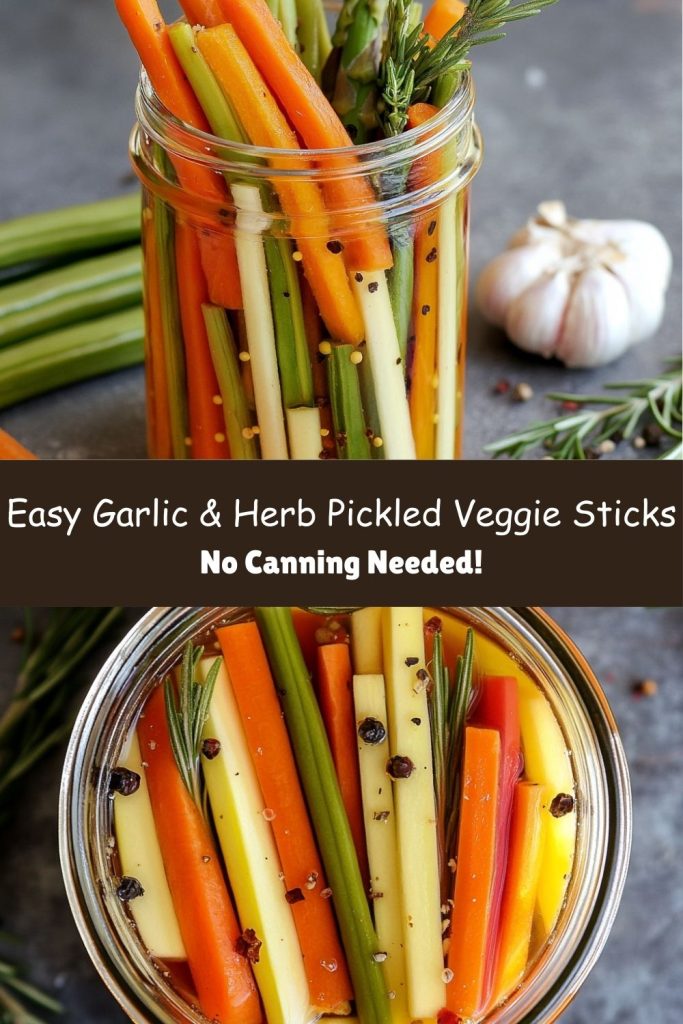
Step 3: Jar Tetris
Pack your blanched veggies snugly into clean jars. Think vertical for aesthetic bonus points. You can mix and match or go single-veg in each jar—your brine, your rules.
Pour warm brine over the veggies, leaving about ½-inch headspace at the top. Use a chopstick or butter knife to poke around and release trapped air bubbles. Top off with more brine if needed.
Wipe the rims clean, screw on the lids, and let them cool at room temp. Once they’re no longer warm to the touch, refrigerate.
Wait time: Minimum 4 hours. But 24 hours? Absolute peak pickle flavor. You’ll taste the difference.
How to Serve These Zesty Beauties
Honestly, these pickled veggie sticks are good on everything. Here are some favorite ways to show them off:
-
Bloody Mary Garnish – Level up your brunch game with a skewer of pickled veggies in your Bloody Mary. Way better than a sad celery stalk.
-
Grain Bowls – Add them to quinoa, rice, or couscous bowls for instant zing.
-
Charcuterie Boards – Serve alongside cured meats, cheeses, and olives for a tangy contrast.
-
Sandwich Upgrade – Add a few spears to sandwiches or wraps for crunch and acidity.
-
Fridge Snacks – Midnight munching? These hit the spot without wrecking your diet.
Or hey—just eat them straight from the jar while standing at the fridge. Zero judgment. We’ve all been there.
Mix It Up!
Don’t be afraid to get creative with this recipe. Once you’ve got the base brine down, it’s easy to remix:
-
Spicy Kick – Add a sliced jalapeño, red chili flakes, or even a dried Thai chili to each jar.
-
Sweet & Smoky – Swap rosemary for thyme and toss in 1 tsp smoked paprika.
-
Citrus Zing – Add strips of lemon or orange peel to the brine.
-
Low-Sodium Version – Reduce salt to ½ tsp and bump up spices for flavor compensation. Try coriander, dill seeds, or fennel.
You can also swap in other veggies: radishes, cauliflower florets, cucumber spears, even watermelon rind! If it crunches, it pickles.
Confessions of a Pickle Addict
Full disclosure: I once swapped olives for pickled carrots in a dirty martini and it was… divine. Don’t knock it ‘til you’ve tried it. I’ve also tucked these veggie sticks into grilled cheese sandwiches (melty, salty, sour—perfection) and chopped them into potato salad for next-level flavor.
One time, my dog managed to knock a jar off the counter and go to town. He’s fine (thankfully I hadn’t added garlic to that batch), but I still laugh every time I think of his briny little crime.
I even brought a jar of these to a potluck and had three people ask me if I’d sell them. Spoiler: I did not. But I did share the recipe. Because everyone deserves access to the joy of crunchy, zippy, garlic-kissed pickles.
Pickling Problems? Solved!
Q: Why are my veggies soft?
A: Probably over-blanching or using produce that’s past its prime. Stick to 1–2 minutes max for blanching, and use the freshest veggies you can find.
Q: My brine is cloudy—did I mess up?
A: Nope! That’s just sediment from spices or minerals in your tap water. Totally harmless. If you want crystal-clear brine, use filtered water and strain your spices.
Q: Can I reuse the brine?
A: You can once, but the flavor won’t be as strong the second time. If you do reuse it, add a splash of fresh vinegar and more herbs for a flavor boost.
Snack Guilt-Free!
Here’s the nutritional lowdown for about ¼ jar (depends on your veggie mix):
-
Calories: 35
-
Fat: 0g
-
Carbs: 6g
-
Fiber: 2g
No guilt, all crunch. These babies are low-cal, low-fat, and full of flavor. They’re basically the ultimate guilt-free snack.
So, there you have it: the humble, homemade Garlic & Herb Pickled Veggie Stick—the snack you didn’t know you needed, but now can’t live without. Once you make a batch, you’ll see what I mean. One jar leads to three, and before you know it, you’ve got a whole section of your fridge dedicated to pickled treasures.
Grab your veggies, heat that brine, and get picklin’. Your crunchy obsession awaits. 💚