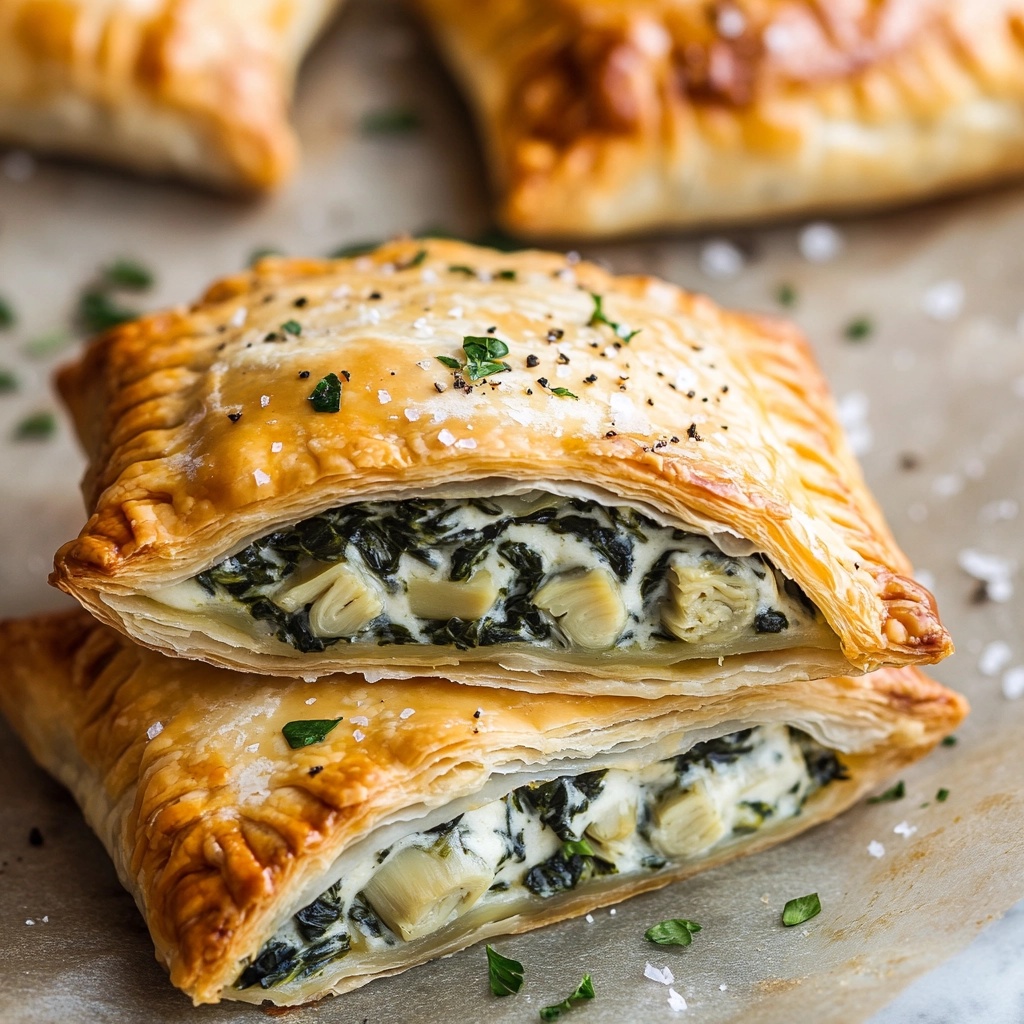
Cold Spinach & Artichoke Hand Pies: Your New Favorite Grab-and-Go Party Star
Hey there, foodie friend! Let’s talk about the ultimate party hack: turning your favorite creamy, cheesy dip into a portable, flaky, *cold* hand pie. Yep, you heard me right—these Cold Spinach & Artichoke Hand Pies are about to become your go-to for picnics, potlucks, or even that “I need something fancy but effortless” moment. Imagine golden pastry crackling under your teeth, giving way to a chilled, tangy filling that tastes like your favorite dip got a gourmet glow-up. Trust me, these little pockets of joy are about to steal the show.
Now, I know what you’re thinking: “Cold? But spinach-artichoke dip is served warm!” Oh, my friend, let me introduce you to the magic of contrast. When these pies cool, the flavors meld into something even richer, and that crisp pastry stays sturdy enough to toss in a lunchbox or pass around at a backyard bash. No more worrying about keeping a dip warm or scrubbing cheese off your slow cooker. These hand pies are here to make your life easier—and tastier.
Whether you’re a pastry pro or a first-time folder, I’ve got your back. We’re talking simple ingredients, foolproof steps, and plenty of chef-approved hacks along the way. Let’s roll up those sleeves and turn that classic dip into something you can literally hold in the palm of your hand. Ready? Let’s bake some magic!

Cold Spinach & Artichoke Hand Pies
How a Picnic Disaster Inspired These Pies
Picture this: It’s 2018, and I’m sprawled on a checkered blanket at a lakeside picnic, desperately trying to salvage a leaking container of spinach-artichoke dip. My best friend’s birthday spread is this close to becoming a soggy cracker graveyard—all because I forgot the ice packs. As I frantically spooned dip onto limp celery sticks, I thought, “There has to be a better way.”
Fast-forward to my kitchen later that night, where I’m eyeballing leftover puff pastry like it’s the answer to all my problems. What if I wrapped that dip in buttery layers and baked it into something sturdy? A few messy experiments (and one flour explosion that left me scrubbing dough off the ceiling fan) later, these hand pies were born. The best part? They tasted even better cold! Now, they’re my signature “I’ve got my life together” party trick—no ice packs required.
They’ve since become my standby for everything from brunch spreads to late-night snacks. And you know what? People LOVE the surprise of a chilled savory pastry. It’s not expected, and that makes it even more memorable.
What You’ll Need (+ Chef Secrets!)
Let’s break down the all-star lineup of ingredients that makes these little pies shine. Most of them are pantry staples or easy grocery grabs, and I’ve sprinkled in a few chef secrets to keep things extra delicious.
-
Puff pastry or pie dough: This is your flaky foundation. Thaw your pastry overnight in the fridge, or give it about 30 minutes on the counter if you’re in a pinch. Puff pastry gives you that bakery-style crunch, while pie dough adds a more rustic, homey feel. You truly can’t go wrong with either—use what makes you happy!
-
Spinach: You can use fresh or frozen here. Just make sure to squeeze out every last drop of water. I’m talking full-on arm workout. Use a clean dish towel to wring it dry—paper towels just don’t cut it. A soggy filling makes for a sad, limp pie. Trust me, you want that creamy mixture to hold its own.
-
Artichoke hearts: Go for canned or jarred (in water, not oil). Oil-packed ones tend to throw off the flavor balance and can make the filling greasy. Chop them roughly—you want texture, not mush.
-
Cream cheese: Full-fat is the way to go for creaminess that holds up when chilled. If you’re dairy-free, grab a good-quality vegan cream cheese. It works like a charm.
-
Mozzarella & Parmesan: Mozzarella brings the melt, Parmesan brings the bite. Can’t find Parm? Asiago or Romano are great swaps. They add that sharp, umami punch that makes this filling shine.
-
Garlic: Fresh is fabulous, but if you’re short on time, ½ tsp of garlic powder works in a pinch. The flavor is still there, just more mellow.
-
Egg: One large egg for brushing = golden, bakery-style finish. No egg? Use plant milk mixed with a tiny bit of maple syrup. It gives a beautiful shine and helps the pies seal.
Bonus tip: Chill your mixing bowl and utensils before you start. Keeping everything cool helps prevent your dough from getting too soft and sticky while you assemble. It’s a small detail that makes a big difference.
Let’s Fold Some Flaky Goodness
Okay, time to roll up your sleeves. This is the fun part—playing with dough and creating edible pockets of joy. Don’t worry if yours don’t look perfect the first time. The flavor makes up for any pastry “personality.”
-
Prep like a pro: Preheat your oven to 375°F (190°C). Line a baking sheet with parchment paper. If you’re working with puff pastry, keep it in the fridge until you’re ready to roll. Warm dough is tricky dough.
-
Mix the magic: In a bowl, combine your squeezed spinach, chopped artichokes, softened cream cheese, shredded mozzarella, grated Parmesan, garlic, and a pinch each of salt and pepper. Taste it! Want more zing? A squeeze of lemon juice brightens it right up.
-
Roll it out: Lightly flour your work surface and roll out your pastry to about ⅛-inch thickness. Use a sharp knife or a large cookie cutter to make 4-inch squares or circles. Pro tip: A mug makes a perfect DIY cutter in a pinch.
-
Fill & fold: Spoon about 1.5 tablespoons of filling onto one side of each piece. Don’t overdo it—resist the urge to pile it high. Fold the dough over to form a pocket, and press the edges with a fork. This crimping is both cute and crucial for keeping everything sealed inside.
-
Egg wash glory: Whisk your egg with 1 tsp of water and brush over the tops of the pies. This gives them that irresistible golden sheen and helps the edges seal tight.
-
Bake to golden: Bake for 18–20 minutes until puffed, golden, and slightly firm to the touch. Cool completely on a wire rack. As they cool, they’ll crisp up even more—perfect for chilling and grabbing later.
How to Serve These Little Stars
Presentation time! These hand pies are cute on their own, but if you want to take it to the next level:
-
Arrange them on a rustic wooden board with fresh herbs—think thyme sprigs or rosemary.
-
Add a bowl of dipping sauce on the side: lemony ranch, spicy aioli, or even a tangy yogurt dip with chopped dill.
-
For outdoor events, stack them in a bento box between layers of parchment so they don’t get smushed.
Hosting brunch? Pair them with sparkling lemonade or iced cucumber water. Late-night snack? Add a glass of chilled white wine or a craft cider. Whatever the vibe, these hand pies adapt like a dream.
Mix It Up! 5 Delicious Twists
The beauty of these hand pies? They’re totally customizable. Use this recipe as your base, and then go wild with variations:
-
Bacon Lover’s: Add ¼ cup of crispy crumbled bacon to the filling. Smoky, salty, and totally indulgent.
-
Spicy Kick: Mix in 1 teaspoon of red chili flakes or finely diced pickled jalapeños for a zingy boost.
-
Vegan Vibes: Use plant-based cheeses and swap the egg wash for a mixture of oat milk and maple syrup. Still golden, still glorious.
-
Mediterranean Magic: Swap Parmesan for crumbled feta and toss in some chopped sun-dried tomatoes. Maybe a little oregano too? Yum.
-
Gluten-Free Goodness: Use gluten-free puff pastry (brands like Schär and GeeFree make solid versions). Just be gentle—it can be a bit delicate to handle.
Confessions of a Hand Pie Addict
True story: I once brought these to a rooftop party, only to find guests sneaking extras into their purses. (Shoutout to Linda from accounting—I saw you!) Over the years, I’ve learned two things:
-
Always make a double batch.
-
If your first attempt looks like a pastry crime scene, just call them “rustic” and keep moving.
Seriously—my early versions leaked cheese like a broken dam. But that’s how I stumbled onto my favorite hack: freeze before baking. It firms up the filling and helps the pies keep their shape in the oven. Just assemble, freeze on a tray until solid, and then bake as usual (adding a few minutes to the baking time).
Your Questions, Answered
Q: Can I freeze these before baking?
A: Totally! Freeze them flat on a tray, then transfer to a freezer bag. When ready to bake, pop them straight into the oven—just add 3–5 extra minutes to the bake time.
Q: Why serve them cold?
A: Serving them cold not only firms up the creamy filling but also lets the flavors meld and deepen. Plus, they’re so much easier to serve and transport without needing to keep them hot.
Q: Help! My filling’s oozing out!
A: Likely culprits? Too much filling or weak edge sealing. Try using less filling next time and double-crimping the edges with a fork. And don’t skip the egg wash—it helps seal everything tight.
Nutrition Per Pie (Because We’re Adults Here)
Calories: ~180-200 | Protein: 5g | Carbs: 15g | Fat: 12g (varies with substitutions). Not health food, but hey—balance is a vibe!
So there you have it—your new favorite cold appetizer, snack, or lunchtime lifesaver. Whether you’re prepping for a backyard bash or packing a lunch that won’t make your coworkers jealous (but definitely will), these Cold Spinach & Artichoke Hand Pies are the answer. Make a batch, share a few, and keep some stashed in your fridge for emergencies (read: midnight cravings).
You’re just a roll, fill, and bake away from handheld happiness. 🥟💚