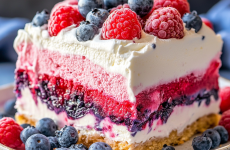
High Protein Cheesecake Jars: Your New Fridge Bestie 🫙✨
Hey friend, pull up a stool at my digital kitchen table! Mason here, your no-apron-required cooking buddy. Remember that glorious moment when dessert and nutrition finally shook hands? That’s exactly what happened the day I stumbled upon these High Protein Cheesecake Jars. Picture this: It was 8 PM after a chaotic Tuesday. My muscles were singing opera from leg day, my sweet tooth was staging a protest, and my energy levels? Deader than my last basil plant. I stood staring into the fridge like it owed me answers. And then – lightbulb moment! What if I took everything I loved about decadent cheesecake (creamy texture! buttery crust! berry bling!) and made it actually nourish my hustle? No baking. No fancy tools. Just layers of joy in a jar.
These little wonders became my edible secret weapon. Post-workout? Jar. Midnight craving? Jar. Need to impress friends without slaving in the kitchen? JAR PARTY. They’re like the Swiss Army knife of snacks – portable, customizable, and packed with 20+ grams of protein to keep you fueled. Forget dry protein bars or sad “healthy” desserts that taste like cardboard regrets. This is creamy, dreamy indulgence that loves you back. Grab some jars, and let’s turn your fridge into a happiness station! 🥄💥
Why These Jars Feel Like Home 🏡
PrintHigh Protein Cheesecake Jars
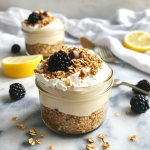
Inspired by dessert cravings and protein goals, these jars became my go-to fix after too many snack-time regrets. Imagine rich cheesecake with none of the guilt—just spoon, scoop, and smile. They’re portioned for control, loaded with protein, and portable for life on the move. Whether it’s post-gym or post-meeting, these are the jars you didn’t know you needed.
- Prep Time: 15 minutes
- chill time: 2 hours
- Cook Time: 2 hours 15 minutes
- Total Time: 4 hours 30 minutes
- Yield: 6 jars 1x
Ingredients
1 cup almond flour (or crushed graham crackers)
2 tbsp melted coconut oil or butter
1–2 tbsp sweetener of choice
Filling Ingredients:
8 oz low-fat cream cheese, softened
1 cup Greek yogurt (2% or non-fat)
1–2 scoops vanilla protein powder
2–3 tbsp sweetener (maple syrup, honey, or sugar-free)
1 tsp vanilla extract
Optional: 1–2 tbsp lemon juice for a zesty lift
Instructions
Make the Crust: Mix almond flour, oil, and sweetener until it feels like damp sand. Press 2–3 tbsp into small jars (4–6 oz). Chill 10–15 mins or bake at 350°F for 8–10 mins until golden.
Mix the Filling: Beat cream cheese until smooth. Add Greek yogurt and blend. Mix in protein powder one scoop at a time, then sweetener and vanilla. Adjust flavor with lemon juice if desired.
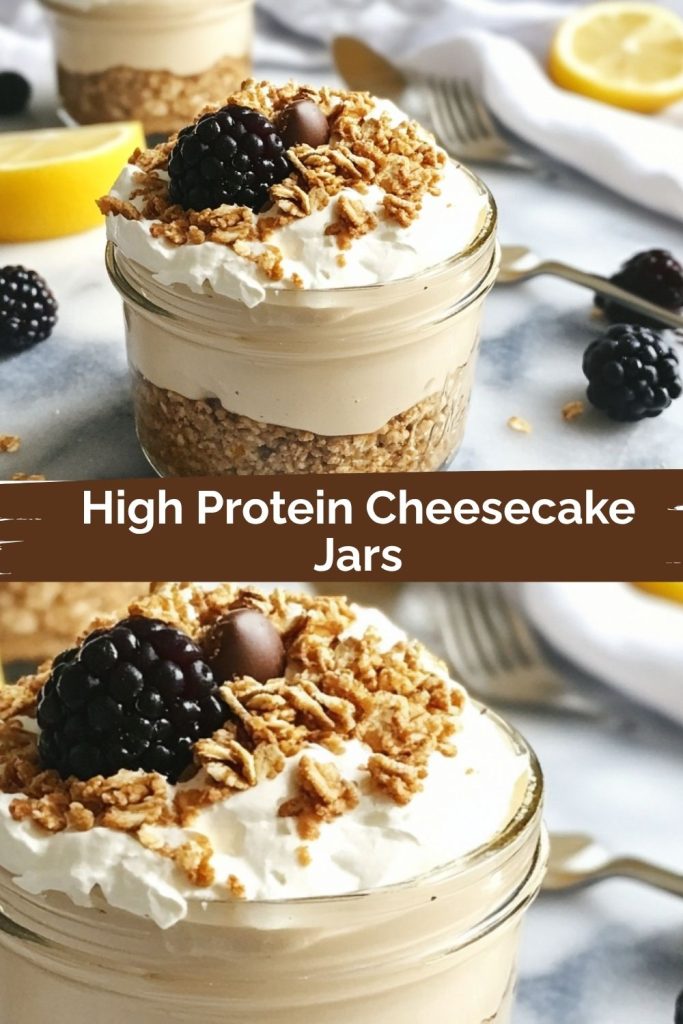
Assemble: Layer about ¼ cup filling over crust in each jar. Add toppings like berries, nuts, or a drizzle of caramel.
Chill: Refrigerate at least 2 hours—overnight is even better for perfect texture.
Notes
Cheesecake without compromise—delicious, nutritious, and made for real life.
Nutrition
- Calories: 220
- Fat: 10–15g
- Carbohydrates: 10–15g
- Protein: 18–22g
Okay, real talk moment. These cheesecake jars? They taste like my grandma’s kitchen meets a gym bag – in the best possible way. See, Nana Hartman made legendary cheesecakes. Her secret? “Butter, cream cheese, and love, kiddo. Mostly butter.” But after she passed, I’d crave that comfort without the… well, butter-coma aftermath. Fast forward to my early cooking experiments (read: disasters involving smoke alarms). One rainy Sunday, I was tinkering with protein powder – trying to make it NOT taste like chalk – when Nana’s voice popped into my head: “Make it taste like home, Mason.”
So I smashed graham crackers like a tiny Viking, whipped Greek yogurt with cream cheese until it sang, and layered it all in her old jam jars. That first bite? Creamy vanilla bliss with a crunchy hug. It wasn’t Nana’s cheesecake, but it felt like her – cozy, generous, and uncomplicated. Now, every time I screw a lid on these jars, I imagine her winking at me from the kitchen beyond, whispering: “Told ya butter wasn’t the only answer, smarty pants.” Food memories, man. They stick to your ribs. ❤️
Your Cheesecake Toolbox: Simple & Swap-Friendly 🧰
Gather these heroes! Every ingredient’s a team player. Don’t stress if you need swaps – I gotchu.
For the Crust (The “Happy Bottom” Layer):
- ½ cup graham cracker crumbs – That nostalgic campfire s’mores vibe! Chef Tip: Smash ’em in a bag with a rolling pin (great for stress relief!). GF? Swap crushed gluten-free oats or almond flour.
- 2 tbsp melted butter – Optional but lush! Binds crumbs & adds richness. Vegan? Coconut oil works! Avoiding fats? Skip it – crust will be crumbly but still tasty.
For the Filling (The “Cloud of Joy” Layer):
- 1 cup Greek yogurt (plain, 2% or full-fat) – The protein MVP! Full-fat = silkier. 2% = tangier. Dairy-free? Thick coconut yogurt (unsweetened) is your friend.
- 8 oz light cream cheese, softened – KEY for cheesecake soul! Light keeps it lean but creamy. Vegan? Use Kite Hill or Miyoko’s cream cheese style spread.
- 2–3 tbsp honey or maple syrup – Sweetens the deal! Start with 2 tbsp – you can add more. Lower sugar? Monk fruit syrup works! Nutty twist? Try agave.
- 1 tsp vanilla extract – The flavor fairy! Splurge on real extract – it matters.
- 1 scoop vanilla protein powder – The muscle magician! Chef Secret: Whey isolate blends smoothest. Casein makes it thicker. Plant-based? Vega or Orgain are champs. HATE protein powder? See FAQ!
Optional Toppings (The “Party Hat” Layer):
- Fresh berries – Strawberries, raspberries, blueberries! Burst of freshness & fiber.
- Lemon zest – Brightens everything! Microplane it right over the jar.
- Chia seeds or chopped nuts – Crunch + omega-3 boost! Walnuts, pecans, or almonds rock.
Let’s Layer Up: No-Bake Bliss in 10 Minutes! ⏱️
Ready? Set? JAR! This is easier than deciding what to binge-watch.
- CRUST CRUNCH TIME: Dump graham crumbs and melted butter (if using) into a bowl. Mix with a fork until it looks like wet beach sand. Chef Hack: No butter? Add 1 tsp water or nut butter to help it clump. Spoon mixture evenly into your jars (4-6 oz size is perfect!). Use the back of a spoon to PRESS it down firmly. This is your flavor foundation – don’t be shy! Tip: Wide-mouth jars = less messy layering.
- FILLING FANDANGO: In a medium bowl, plop in your softened cream cheese. Beat it with a hand mixer (or vigorous fork action!) for 30 seconds until smooth and creamy – no lumps allowed! Add Greek yogurt, honey/maple syrup, and vanilla. Mix again until silky. Chef Insight: Room temp cream cheese is NON-NEGOTIABLE unless you want lumpy filling! Take it out 30 mins prior.
- PROTEIN POWER-UP: Sprinkle the protein powder over your creamy mixture. CRITICAL STEP: Mix SLOWLY at first (low speed if using a mixer), then ramp up. Scrape the bowl! Mix until JUST combined and velvety. Watch-Out! Over-mixing protein powder can make it gummy. Think gentle folds.
- JAR ARTISTRY: Spoon or pipe the filling over your crust layer. Smooth the tops with your spoon – get fancy like you’re frosting a tiny cake! Pro Move: Tap jars gently on the counter to settle filling and remove air bubbles.
- TOP IT LIKE IT’S HOT (OR COLD!): Pile on those berries, sprinkle zest, or scatter seeds/nuts. Chef Trick: Add toppings AFTER chilling if using juicy berries (prevents sogginess).
- CHILLAX SESSION: Screw lids on tight. Refrigerate for AT LEAST 30 minutes. Patience Pays: Overnight is MAGIC – flavors meld, filling firms up beautifully. Your future self will high-five you!
Jar Presentation: Eat Pretty! 🌸
These cuties practically serve themselves! For maximum joy:
- Pop a colorful reusable straw or tiny spoon right in the jar before handing it out.
- Dust with a light sprinkle of cinnamon or extra protein powder for “bakery vibes.”
- Line ’em up on a wooden board for a brunch spread – instant crowd-pleaser!
- Garnish just before serving: A mint leaf, edible flower, or extra drizzle of honey screams “I tried!” (even though you barely did).
Eat straight from the jar – zero dishes! Perfect for picnics, desk lunches, or sneaking spoonfuls while hiding from your cat.
Shake It Up: Your Jar, Your Rules! 🎨
Don’t stop at vanilla! Get wild with these twists:
- Chocolate Peanut Butter Cup: Swap vanilla protein for chocolate. Layer filling with 1 tbsp melted PB! Top with dark chocolate shavings.
- Berry Swirl Sensation: Before chilling, swirl 2 tbsp berry jam or pureed fresh berries into the filling layer. Looks gorgeous!
- Lemon Sunshine: Add 1 tbsp fresh lemon juice + extra zest to filling. Use crushed shortbread cookies for crust. Top with blueberry compote.
- Tropical Escape: Use coconut yogurt + coconut cream cheese. Mix crushed pineapple (drained!) into filling. Top with toasted coconut flakes & mango.
- Vegan Powerhouse: Use coconut yogurt, vegan cream cheese, maple syrup, and plant protein powder. Crust: Almond flour + coconut oil.
Mason’s Musings & Kitchen Confessions 🤫
These jars have seen some… evolution. Version 1.0 involved me forgetting the sweetener (tasted like sadness with protein). Version 2.0: I used un-softened cream cheese – let’s just say it looked like cottage cheese surprise. NOT cute. Now? They’re foolproof! My biggest laugh? That time I brought them to a potluck labeled “Protein Power Pots.” My buddy Dave ate three, then gasped, “Wait… this is HEALTHY?!” Classic. The magic? These jars forgive mistakes. Filling too thick? Add a splash of milk. Too thin? Chill longer or add a smidge more protein powder. They’re resilient, just like us. Make ’em your own!
Your Jar Questions, Answered! ❓
Q: Can I skip the protein powder? It always tastes chalky!
A: Absolutely! Omit the powder and increase Greek yogurt to 1.5 cups. You’ll lose some protein (aim for ~12g/jar), but gain creaminess. Add 1 extra tbsp sweetener to balance the tang. For protein powder haters: Collagen peptides blend in almost flavorlessly!
Q: Help! My filling is runny/not setting. What happened?
A: Three likely culprits:
1) Cream cheese wasn’t soft enough (lumps = uneven mixing).
2) Over-mixed after adding protein powder (creates gumminess then weepiness).
3) Didn’t chill long enough! Patience, grasshopper. Pop it back in the fridge for 1-2 hours. If still too soft, gently stir in 1 tsp cornstarch mixed with 1 tsp cold water.
Q: How long do these last in the fridge?
A: They’re superstars for meal prep! Store sealed jars for 4-5 days. Add fresh toppings (like berries) just before eating to prevent sogginess. The crust softens slightly over time but still tastes amazing.
Q: Can I freeze these cheesecake jars?
A: YES! Freeze for up to 1 month. Thaw overnight in the fridge. Texture stays creamy! Note: Toppings like fresh fruit may get icy – add after thawing.
Fuel Breakdown (Per Jar, Approx.) 🔋
- Calories: 220-280
- Protein: 20-25g (Muscle magic!)
- Carbs: 15-18g (Mostly from wholesome sources!)
- Fat: 8-12g (The good, satiating kind!)
Note: Exact numbers vary based on ingredients/brands used. Enjoy the delicious fuel!
Final Thoughts
If you’ve ever wanted dessert that high-fives your goals and your taste buds, these High Protein Cheesecake Jars are it. They’re fast, flexible, and feel like a treat without the sugar crash. Whether you’re spooning one post-workout, packing a few for the week, or showing off at brunch (hello, effortless glam!), these jars have your back. No stress, no oven, just layered goodness in a jar that says, “I care… but I also don’t have time to bake.” So go ahead—stock that fridge, grab a spoon, and let joy be part of your meal prep. Dessert just got its protein badge.