Hey There, Hungry Friend! Let’s Make Magic in a Dish
Picture this: It’s been one of those weeks. Your energy’s running on fumes, but your soul craves something celebratory—something that whispers “fancy dessert” without screaming “sweat over a hot oven for hours.” That’s exactly why I’m sliding this Blackberry Pistachio Cream Delight across my digital kitchen table to you. This no-bake stunner? It’s my edible love letter to effortless elegance. We’re talking layers that dance—crunchy biscuit base, velvety pistachio cream, dreamy vanilla-speckled cheese, and a blackberry topping that glistens like jewels. It’s the kind of dessert that makes Tuesday nights feel like anniversaries and impresses your in-laws without you breaking a sweat. Best part? It comes together faster than you can scroll through your streaming queue. So grab a spoon (or six—no judgment here), and let’s turn simple ingredients into pure, spoon-clinking joy. Trust me, your future self, mid-bite, will thank you.
That One Summer & the Pistachio Epiphany
PrintBlackberry Pistachio Cream Delight

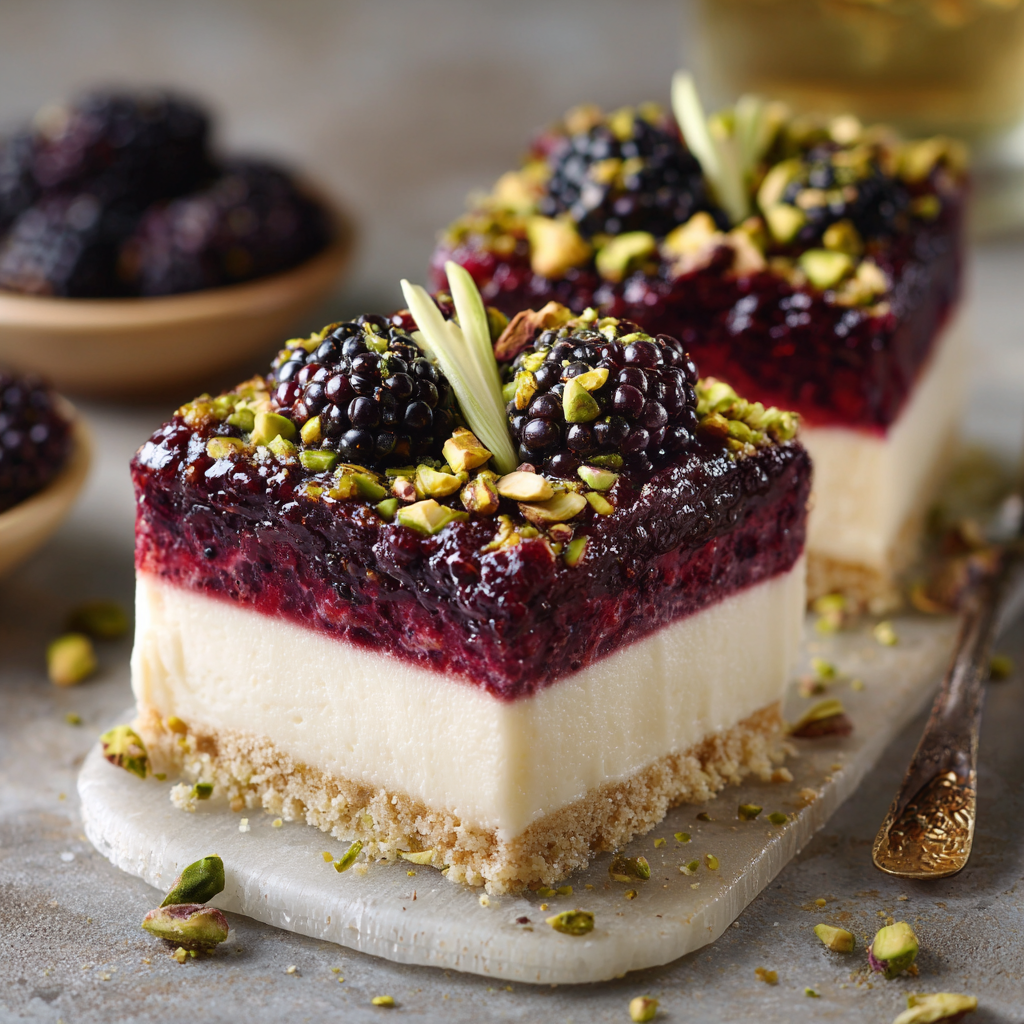
This no-bake layered dessert is a stunning mix of crunchy, creamy, and fruity. With a nutty pistachio layer, a silky cream cheese middle, and a rich blackberry compote on top—every bite is a burst of texture and flavor. It’s elegant enough for guests, yet easy enough to treat yourself anytime.
- Prep Time: 25 minutes
- chill time: 1 hour
- Total Time: 1 hour 25 minutes
- Yield: 6 1x
Ingredients
For the Base:
1 cup crushed digestive biscuits
1/4 cup unsalted butter, melted
For the Pistachio Layer:
1 cup shelled pistachios, finely ground
1/4 cup confectioners’ sugar
1/4 cup heavy cream
For the Cream Cheese Layer:
1 cup cream cheese, softened
1/2 cup confectioners’ sugar
1 tsp vanilla extract
For the Blackberry Layer:
2 cups fresh blackberries
2 cups fresh blackberries
1/2 cup granulated sugar
1 tbsp lemon juice
2 tsp cornstarch
For the Topping:
1/4 cup shelled pistachios, chopped
Fresh blackberries, for garnish
Instructions
Make the base: Mix crushed biscuits and melted butter. Press into the bottom of a dish or dessert cups. Chill for 15 minutes.
Pistachio layer: Blend ground pistachios with confectioners’ sugar and heavy cream until creamy. Spread over the biscuit base.
Cream cheese layer: Whip cream cheese, sugar, and vanilla until smooth. Layer over the pistachio mixture.
Blackberry layer: In a saucepan, combine blackberries, sugar, lemon juice, and cornstarch. Cook over medium heat until thickened (5–7 mins). Cool slightly, then spread over cream cheese layer.
Notes
Top it off: Sprinkle with chopped pistachios and garnish with fresh blackberries.
Chill for at least 1 hour before serving.
Nutrition
- Calories: 360 kcal
- Fat: 24g
- Carbohydrates: 32g
- Protein: 6g
This recipe? It’s got roots in a sun-drunk afternoon at my Aunt Margo’s farm. I was maybe twelve, “helping” (read: sneaking berries) as she made her famous blackberry cobbler. Her neighbor, Mr. Rossi, ambled over with a jar of home-salted pistachios. “Try ’em with the berries, kid,” he winked. Skeptical, I tossed a berry and a nut into my mouth. BOOM. Tart met earthy-sweet in a fireworks display I never forgot. Years later, experimenting after a disastrous baked cheesecake (RIP, soggy crust), that memory hit me. What if I layered those flavors—no oven required? The first attempt was… chaotic (think pistachio paste that could mortar bricks). But tweaking the cream-to-nut ratio? Revelation. Now, every time I make this, I taste sunshine, Aunt Margo’s laughter, and Mr. Rossi’s wisdom. Food’s magic like that—it ties memories right to your tastebuds.
Your Flavor Toolkit: Simple, Swappable & Full of Personality
Gather these friends! Pro-tip: Measure everything before you start. No-bake desserts wait for no one.
- For the Base:
- 1 cup crushed digestive biscuits: Their subtle sweetness & sturdy crunch are perfect. Chef’s Swap: Graham crackers work! For gluten-free, try gluten-free oats blitzed with 1 tbsp maple syrup.
- 1/4 cup unsalted butter, melted: The glue! Unsalted lets you control the saltiness. Chef’s Insight: Melt it gently—burnt butter = sad base.
- For the Pistachio Layer:
- 1 cup shelled pistachios, finely ground: Use raw or roasted UNSALTED. Salted nuts make this layer too intense. Chef’s Tip: Grind them alone first in your food processor to avoid nut butter! A few small chunks add nice texture.
- 1/4 cup confectioners’ sugar: Dissolves seamlessly for smoothness. Granulated sugar = gritty sadness.
- 1/4 cup heavy cream: Adds lush richness. Chef’s Swap: Full-fat coconut milk (chilled, cream only) for dairy-free.
- For the Cream Cheese Layer:
- 1 cup cream cheese, softened: FULL FAT. Brick-style, not spreadable tubs. Chef’s Must: Soften it properly (30 mins out of the fridge). Cold cheese = lumpy layer.
- 1/2 cup confectioners’ sugar: Sweetens without graininess.
- 1 tsp vanilla extract: Pure extract only! Imitation tastes like regret. Chef’s Twist: Try almond extract for a subtle marzipan vibe.
- For the Blackberry Layer:
- 2 cups fresh blackberries: Peak ripeness is key! Frozen work great too—no thawing needed. Chef’s Insight: Taste one! If super tart, add an extra tbsp sugar.
- 1/2 cup granulated sugar: Balances the berries’ tang.
- 1 tbsp lemon juice: Brightens everything. Fresh squeezed is best!
- 2 tsp cornstarch: Our thickener. Mix with 1 tbsp COLD water first to avoid lumps!
- For the Topping:
- 1/4 cup shelled pistachios, chopped: For crunch & visual pop!
- Fresh blackberries, for garnish: Makes it look bakery-level fancy.
Let’s Build This Beauty: Step-by-Step (with Chef Secrets!)
Ready? Aprons optional, enthusiasm mandatory. We’re layering like pros!
- Make the Base (The Foundation of Joy): Dump those crushed biscuits into a bowl. Pour in the melted butter. Stir like you mean it until it looks like wet sand. Press this mix FIRMLY into the bottom of your dish (I use an 8×8″ square pan or 6 individual glasses). Use the bottom of a glass or measuring cup to tamp it down hard—this prevents crumbling later! Chill for 15 mins. Chef’s Hack: Lining your pan with parchment paper? Lifesaver for clean slices later!
- Whip Up the Pistachio Dream: Grab your food processor (a blender works too). Add the ground pistachios and confectioners’ sugar. Pulse a few times to combine. With the motor running, slowly drizzle in the heavy cream. Stop when it’s a thick, spreadable paste—think cookie dough consistency. DON’T over-blend or it’ll get oily. Plop this glorious green goodness onto your chilled base. Gently spread it into an even layer with an offset spatula or the back of a spoon. Chef’s Whisper: Lick the spatula. It’s a chef’s privilege.
- Create the Cloud (Cream Cheese Layer): In a medium bowl, beat the softened cream cheese with an electric mixer until smooth and fluffy (about 1 min). Sift in the confectioners’ sugar (prevents lumps!) and add the vanilla. Beat again until silky and light (another 1-2 mins). Dollop this over the pistachio layer. Spread it gently—don’t press hard and disturb the layer below! Chef’s Tip: Wipe your spatula clean between spreads for ultra-neat layers.
- Berry Bliss Compote: In a small saucepan, combine blackberries, sugar, and lemon juice. Heat over medium heat, stirring occasionally. Mash some berries with the back of your spoon as they soften (about 3 mins). In a tiny bowl, whisk the cornstarch with 1 tbsp COLD water until smooth. Stir this slurry into the bubbling berries. Keep cooking, stirring constantly, until the mixture thickens noticeably and coats the spoon (2-4 more mins). It should look glossy and jammy. Remove from heat and let cool for 10 mins—hot compote melts the cream layer! Pour or spoon it gently over the cream cheese layer. Chef’s Hack: Strain the compote for a super smooth top layer, but I love the rustic seeds!
- The Grand Finale (Topping!): Sprinkle those chopped pistachios artfully over the blackberry layer. Dot with fresh blackberries. Chef’s Flair: A tiny sprinkle of edible rose petals or lemon zest? Stunning for guests!
- The Hardest Part: The Chill: Cover loosely and refrigerate for AT LEAST 1 hour. Seriously, walk away. This sets the layers, firms everything up, and lets the flavors mingle. Overnight? Even better! Chef’s Confession: I’ve “tested” it after 30 mins. It’s messy but delicious. Aim for the hour!
Showtime: Serving Your Masterpiece
You’ve waited (mostly) patiently! For squares: Run a thin knife around the pan’s edge. Use the parchment paper to lift it out gently. Slice with a hot, wet knife—dip it in hot water, wipe dry, slice, repeat—for pristine layers. For glasses: Just grab spoons! Serve it chilled. A dollop of barely-sweetened whipped cream or a tiny mint leaf adds pizzazz, but honestly? It’s pure perfection naked. This dessert shines bright on a potluck table or as the star of your solo Netflix feast.
Make It Your Own: Delicious Detours
Play with your food! Here are some tasty twists:
- Berry Swap: Raspberries, blueberries, or a mix! Adjust sugar slightly based on tartness.
- Nutty Nirvana: Swap pistachios for toasted almonds or hazelnuts in both layers. Different vibe, same wow.
- Lighter Lift: Use reduced-fat cream cheese and swap half the heavy cream in the pistachio layer for Greek yogurt. Still creamy, slightly tangier.
- Chocoholic’s Dream: Add 2 tbsp cocoa powder to the biscuit base mix. Or sprinkle dark chocolate shavings on top with the pistachios.
- Citrus Spark: Add 1 tsp orange zest to the cream cheese layer or swap lemon juice for lime in the compote. Zing!
Mason’s Musings: From Chaos to Culinary Hug
This recipe? It’s my kitchen evolution in a dish. That first brick-like pistachio paste taught me patience (and the power of a splash of extra cream). The time I used salted pistachios? We called it “Salted Berry Surprise”… and drank extra water. Now, it’s my go-to “I need a win” dessert. It’s traveled to countless potlucks, been birthday “cake” for my dairy-free friend (coconut cream version!), and even starred in my cousin’s tiny wedding. The beauty is its flexibility – fancy glasses for date night, a big slab for game day. It feels celebratory without being precious. Pro Tip: If your compote seems too runny after chilling (berries vary!), just spoon it over individual servings instead of the whole pan. Remember, cooking’s an adventure, not a perfection contest. If your layers smoosh a little? Call it “rustic” and eat it anyway. Flavor wins!
Your Questions, My Answers: Let’s Troubleshoot!
We’ve all been there. Here’s the scoop on common hiccups:
- Q: My base is crumbly! Did I mess up?
A: Chances are, it wasn’t pressed firmly enough. Next time, really tamp it down hard! Also, ensure your butter is fully melted and mixed in. If it’s already made, just embrace the “deconstructed” vibe – scoop it like a parfait! - Q: Can I make this ahead? How long does it last?
A: Absolutely! It’s a make-ahead marvel. Assemble it completely and refrigerate for up to 2 days. The compote might weep a tiny bit of juice over time, but it still tastes amazing. I don’t recommend freezing – the cream cheese layer can get grainy. - Q: My pistachio layer is super thick/grainy. Help!
A: Thick usually means not enough cream or over-blending (which releases oils). Next time, drizzle in cream slowly until it’s spreadable. Graininess? You likely didn’t grind the nuts fine enough before adding the cream. A powerful blender helps! For this batch, just crumble it on top as garnish instead. - Q: The blackberry layer is too runny/thick. Fixes?
A: Runny? The cornstarch might not have activated fully (did you mix it with cold water first?) or it needed another minute of boiling. Thicken it by simmering a tbsp of compote with an extra 1/2 tsp cornstarch slurry, then mix back in. Too thick? Stir in a teaspoon of warm water or lemon juice at a time. Berry ripeness affects this!
Nutritional Nibbles (Approximate per Serving)
Let’s be real, this is a treat! But knowledge is power:
Calories: ~360 kcal | Fat: 24g | Carbs: 32g | Protein: 6g | Sugar: 20g | Fiber: 3g
Note: Values can vary based on specific ingredients/brands used. Enjoy mindfully!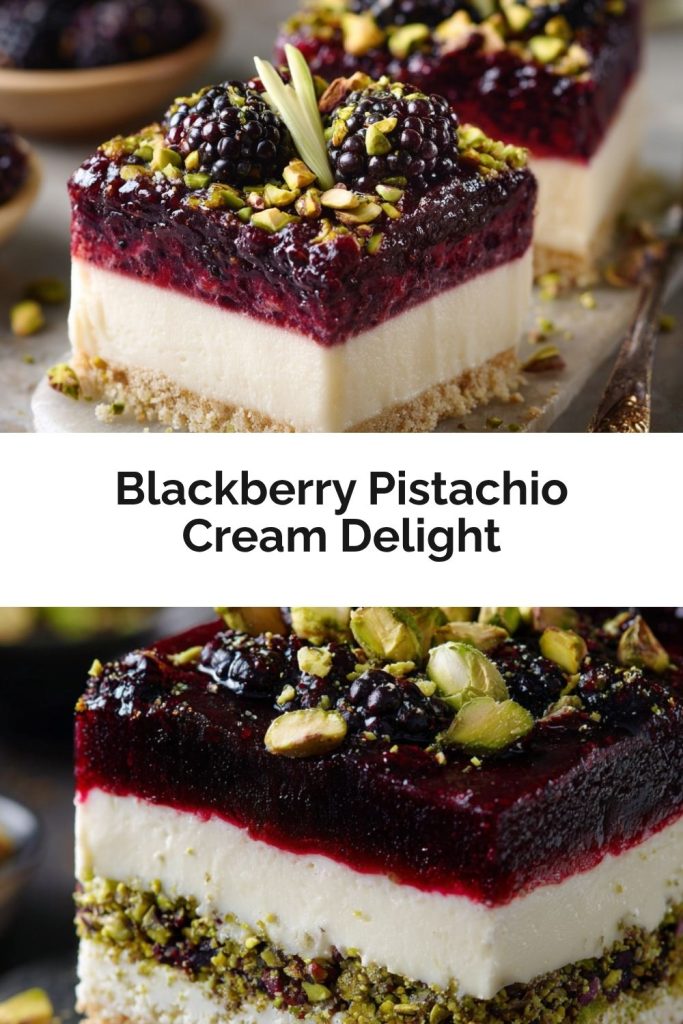
Final Thoughts
At the end of a long day—or the start of a special one—this Blackberry Pistachio Cream Delight is a reminder that magic doesn’t need to be complicated. It’s proof that a few good ingredients, layered with love (and maybe a spoonful of nostalgia), can turn into something unforgettable. Whether you serve it up in fancy glasses or straight from the pan with your favorite people, this no-bake beauty is more than dessert—it’s a celebration in every bite. So here’s to flavor, flexibility, and finding joy in the kitchen without breaking a sweat. Save yourself a corner slice… you’ve earned it