Hey There, Hungry Friends! Let’s Talk Katsu Magic
Picture this: a steaming bowl of fluffy rice, topped with a golden, shatteringly crispy cutlet that crackles when you bite into it. Now drizzle that beauty with a sweet-tangy sauce that dances between savory and slightly fruity—welcome to the glorious world of Japanese Katsu Bowls, my friends! If you’ve ever craved that restaurant-style crunch without the fuss, you’re in the right place. I’m Mason, your flavor-obsessed guide, and today we’re rolling up our sleeves for a 30-minute kitchen adventure that’ll make your taste buds sing. No fancy skills required—just good vibes and a skillet.
Why do I adore this dish? Because it’s pure edible joy. It’s the kind of meal that turns a dreary Tuesday into a mini celebration. Whether you’re team chicken or pork (or heck, even eggplant!), katsu bowls are forgiving, fast, and crazy satisfying. They’re Japan’s answer to comfort food—think fried chicken’s chic cousin with a tangy twist. And that tonkatsu sauce? It’s like barbecue sauce’s cooler sibling who traveled the world. Best part? We’re keeping it real with pantry staples. So grab your apron—let’s make some delicious chaos together!
My First Katsu Crush: A Tale of Crispy Redemption
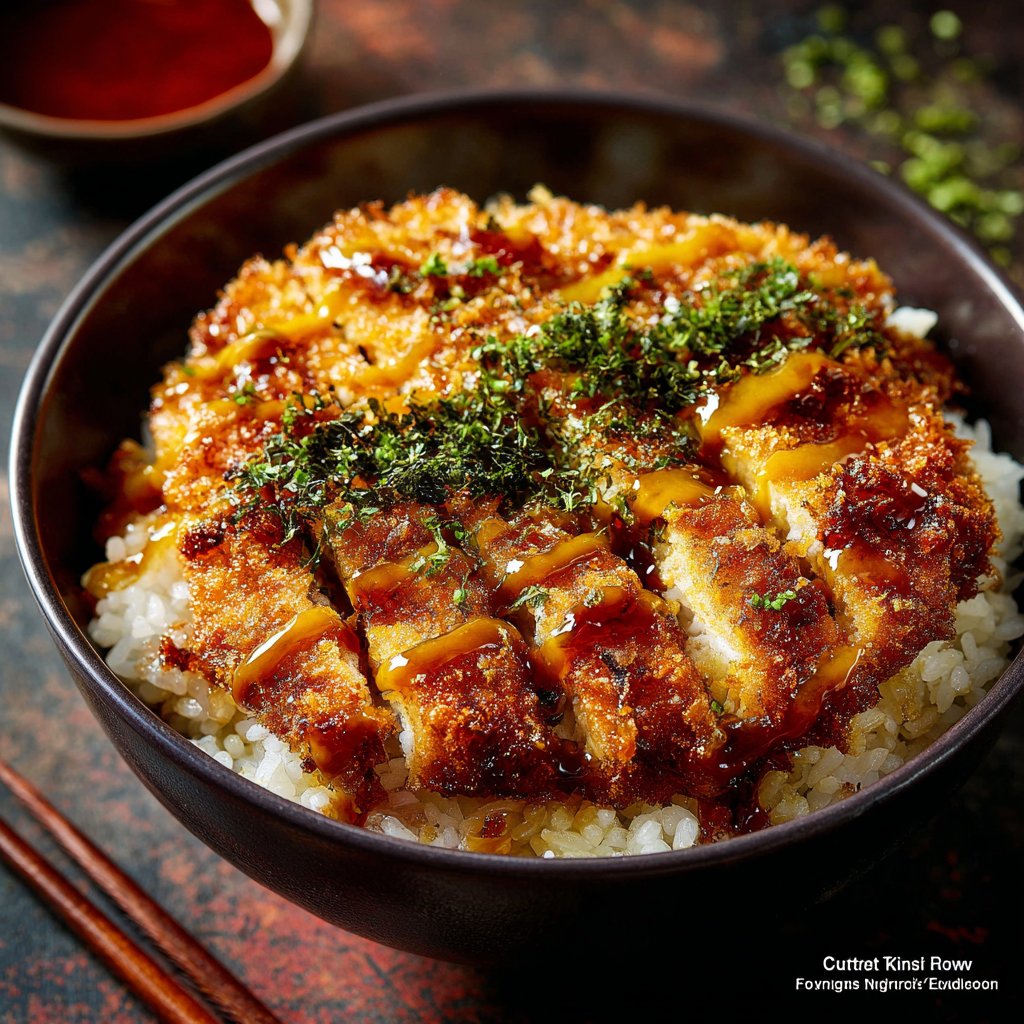
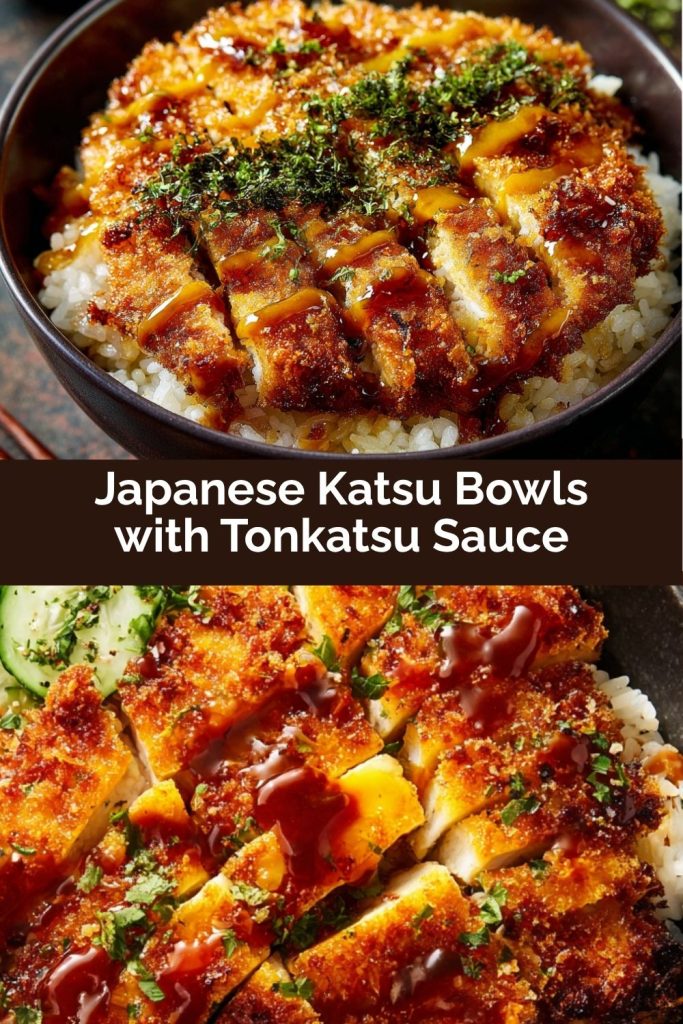
PrintJapanese Katsu Bowls with Tonkatsu Sauce
Crispy, golden cutlets over fluffy white rice, drizzled with a sweet and tangy tonkatsu sauce—this bowl delivers pure Japanese comfort in every bite. Whether you’re team chicken or pork, this crunchy, saucy favorite is easy to make and totally satisfying.
- Prep Time: 15 mins
- Cook Time: 15 mins
- Total Time: 30 mins
Ingredients
2 boneless chicken breasts or pork loin cutlets (pounded to ½-inch thick)
½ cup all-purpose flour
2 large eggs, beaten
1 cup panko breadcrumbs
Oil for frying (vegetable or canola)
3 cups cooked white rice (preferably sushi rice)
½ cup tonkatsu sauce (store-bought or homemade)
Fresh parsley or green onions for garnish (optional)
Homemade Tonkatsu Sauce:
3 tbsp ketchup
2 tbsp Worcestershire sauce
1 tbsp soy sauce
1 tsp sugar
Instructions
Prep the Tonkatsu Sauce: Mix ketchup, Worcestershire, soy sauce, and sugar. Set aside.
Bread the Cutlets: Dredge chicken or pork in flour, dip in beaten egg, then coat in panko. Press gently so crumbs stick well.
Fry to Perfection: Heat ½ inch of oil in a skillet over medium heat. Fry cutlets until golden brown and cooked through (about 3–4 mins per side). Drain on paper towels.
Assemble the Bowls: Slice katsu into strips. Place over warm rice in a bowl, drizzle with tonkatsu sauce, and garnish with parsley or green onions.
Serve Immediately: Enjoy while the cutlet is crispy and the sauce warm.
Notes
Crispy, saucy, and seriously crave-worthy—these katsu bowls bring Japanese comfort straight to your kitchen.
Nutrition
- Calories: 600–700
- Fat: 25g
- Carbohydrates: 70g
- Protein: 35g
Let me take you back to my rookie cooking days. I was 22, living in a tiny apartment with a stove that hissed like a disgruntled cat. I’d just stumbled out of a grueling shift at the café where I worked, dreaming of something more exciting than instant ramen. Enter: katsu. I’d tried it at a hole-in-the-wall spot downtown—one bite of that crispy pork cutlet dunked in glossy sauce, and I was hooked. But my first homemade attempt? Disaster. I used soggy breadcrumbs, under-seasoned the meat, and burned the oil. The result? Sad, greasy strips that tasted like regret.
But here’s the thing—I refused to let katsu win. I called my buddy Hiro, half-Japanese and full of kitchen wisdom. He came over, laughed at my “crumb crime scene,” and showed me the secrets: pounding the meat thin for even cooking, double-dipping in egg for extra crunch, and—most importantly—patience with the oil temp. We ate that second batch cross-legged on my floor, rice spilling everywhere, sauce on our chins. It wasn’t pretty, but it was perfect. That’s when I realized: great food isn’t about perfection. It’s about sharing the messy, delicious journey. Now, every time I make katsu, I hear Hiro’s chuckle in my head—and I hope this recipe becomes your kitchen victory story too.
Your Katsu Toolkit: Simple Ingredients, Big Flavor
Gather these heroes—most might already be in your pantry! Pro tip: Mis en place (fancy for “set up first”) is your friend. Trust me, breading chaos is real.
- 2 boneless chicken breasts or pork loin cutlets (pounded to ½-inch thick): Chicken’s lean and quick; pork’s richer. Chef hack: Freeze meat 20 minutes first—it slices like butter!
- ½ cup all-purpose flour: Our crunchy foundation. Gluten-free? Swap rice flour.
- 2 large eggs, beaten: The “glue” for our panko armor. Add a splash of water for lighter coating.
- 1 cup panko breadcrumbs: NON-NEGOTIABLE. These Japanese flakes crisp up like magic. Substitute? Crushed cornflakes in a pinch.
- Oil for frying (vegetable or canola): High smoke point = no kitchen smoke alarms serenading you.
- 3 cups cooked white rice: Sushi rice’s sticky sweetness is ideal. Day-old rice? Reheat with a damp towel over it.
- ½ cup tonkatsu sauce: Store-bought saves time, but homemade’s worth it (recipe below!).
- Fresh parsley or green onions: Optional confetti for color. Chives or sesame seeds work too!
Homemade Tonkatsu Sauce (aka Liquid Gold):
- 3 tbsp ketchup: Sweet base. Use no-high-fructose corn syrup if you’re fancy.
- 2 tbsp Worcestershire sauce: Umami depth. Vegan? Coconut aminos.
- 1 tbsp soy sauce: Salty kick. Tamari for gluten-free.
- 1 tsp sugar: Balances acidity. Honey or maple syrup also rock.
Why DIY sauce? It takes 2 minutes and tastes brighter than bottled—plus, you control the sweetness!
Let’s Get Crispy: Your Foolproof Katsu Blueprint
Ready for crunch therapy? Follow these steps—I’ve packed ’em with hard-earned hacks!
- Prep the Tonkatsu Sauce: Whisk ketchup, Worcestershire, soy sauce, and sugar in a bowl. Chef secret: Let it sit 10 minutes—flavors mingle and deepen! Taste and tweak: more sugar for sweetness, soy for salt.
- Pound Like a Pro: Place meat between plastic wrap or in a bag. Pound to ½-inch thickness with a skillet, wine bottle, or actual mallet. Why? Even thickness = no raw spots! Salt both sides generously—this is your flavor foundation.
- Bread Like a Boss (The Triple Dip): Set up three stations: flour → eggs → panko. Dredge cutlets in flour (shake off excess!), dunk in egg (let drip!), then press FIRMLY into panko. Game-changer: Press crumbs with your palm—they stick better. Chill breaded cutlets 5 minutes (prevents shedding!).
- Fry to Golden Glory: Heat ½ inch oil in a heavy skillet (cast iron rocks!) over medium heat. Test with a panko crumb—it should sizzle gently. Too hot? Burnt crumbs. Too cool? Greasy cutlets. Fry 3-4 minutes per side until GBD (Golden Brown Delicious). Drain on a wire rack over paper towels—never pile them! (Steam = soggy sadness).
- Slice & Serve with Swagger: Rest cutlets 2 minutes (juices redistribute!), then slice into sexy 1-inch strips. Fan over warm rice. Drizzle with sauce—don’t drown it! Garnish with green onions. Critical step: Snap a pic before devouring. #katsuwins
Pro Tips:
– Oil temp dropping? Fry in batches. Crowding = oily katsu tragedy.
– No thermometer? Stick a wooden chopstick in oil. Bubbles around it = ready.
– Vegetarian? Swap meat for firm tofu or portobello mushrooms—same breading magic!
Plating Perfection: How to Serve Your Masterpiece
Katsu bowls are all about texture contrast. Start with a shallow bowl—spread warm rice as your canvas. Artfully layer those crispy cutlet strips (show off that golden crust!). Drizzle sauce in zigzags or a lazy river across the top. Sprinkle with green onions for fresh bite. Feeling extra? Add quick-pickled cucumbers (rice vinegar + sugar + salt) or a soft-boiled egg with jammy yolk. Serve IMMEDIATELY—that crunch waits for no one! Pair with miso soup or a crisp Asian slaw. Chopsticks optional, big appetite mandatory.
Mix It Up: 5 Delicious Twists on Classic Katsu
Once you master the basics, play with these riffs!
- Curry Katsu Don: Skip tonkatsu sauce. Simmer Japanese curry roux with veggies, pour over rice and katsu. Cozy upgrade!
- Katsu Sando: Sandwich sliced katsu between shokupan (Japanese milk bread) with sauce and shredded cabbage. Lunchbox hero.
- Veggie Power: Use thick eggplant slices, sweet potato slabs, or cauliflower steaks. Same breading, extra plant love.
- Spicy Kick: Add sriracha to tonkatsu sauce or sprinkle togarashi (Japanese chili blend) over the bowl.
- Deconstructed “Sushi” Bowl: Top rice with katsu, avocado slices, cucumber, and a drizzle of spicy mayo.
Mason’s Musings: Katsu Confessions & Evolution
This recipe’s my kitchen workhorse—it’s survived midnight cravings, last-minute potlucks, and one infamous date night where I accidentally used powdered sugar instead of flour (don’t ask). Over time, I’ve learned: freezing panko before breading makes it extra crunchy, and adding grated garlic to the egg wash adds subtle depth. The sauce? I’ve tweaked it endlessly—sometimes with apple butter for fruitiness, or mirin for complexity. But the core stays: simple, fast, soul-warming. Funny story: my niece calls it “dinosaur chicken” because of the craggy crust. Whatever gets kids eating, right? Remember: cooking’s a journey. Burn a cutlet? Sauce too salty? Welcome to the club. Order pizza, laugh it off, try again tomorrow. That’s the real secret ingredient.
Katsu SOS: Your Burning Questions, Answered
Q: Can I bake instead of fry?
A: Absolutely! Bake at 400°F (200°C) on a wire rack over a sheet pan for 15-20 mins, flipping halfway. Spritz with oil for browning. It’s lighter, but slightly less shatteringly crisp.
Q: My breading fell off! What did I do wrong?
A: Three common culprits: 1) Didn’t shake off excess flour, 2) Didn’t press panko firmly enough, or 3) Oil wasn’t hot enough. Chill breaded cutlets before frying—it helps glue everything!
Q: How do I store leftovers?
A: Store components separately! Keep katsu uncovered in the fridge (to preserve crispness) for up to 2 days. Reheat in an air fryer or toaster oven—never microwave (it turns to rubber). Sauce stays good for 2 weeks refrigerated.
Q: Help! My sauce tastes too vinegary.
A: Easy fix: balance with a pinch more sugar or a teaspoon of apple juice. Worcestershire can vary in acidity. Taste as you go—you’re the boss!
Nutritional Notes (Because Balance, Right?)
Per Serving (with chicken, 1 cup rice, and sauce): ~650 calories, 38g protein, 24g fat (mostly from frying), 70g carbs. Want it lighter? Bake the katsu, use cauliflower rice, or halve the sauce. But hey—life’s short. Sometimes you need that crispy hug in a bowl.
Final Thoughts:
Katsu bowls are more than just crispy cutlets and saucy rice—they’re a crunchy, cozy, crave-worthy ritual. Whether you’re chasing that nostalgic restaurant fix or simply want a weeknight dinner that delivers maximum joy with minimum fuss, this recipe’s got your back. From sizzling skillet to happy forkfuls, every bite is a reminder that comfort food doesn’t have to be complicated—just made with love (and maybe a little panko magic). So go ahead, get a little messy, laugh at the flour on your shirt, and serve up something golden. You’ve earned it.